Daz to Blender Bridge is a free add-on that was introduced at the end of 2020. It is a tool that allows for easy transfer of any object from the Daz Studio to the Blender. Since its release, it has been constantly updating and improving. So even if you already heard of it – it probably has new things for you.
If you prefer watching, see our older video below, otherwise keep reading.
If you prefer watching, see our video below, otherwise keep reading.
This awesome tool is kind of a big deal because Blender is a really popular free 3D software that has wide functionality. Thus using Blender in combination with the Daz Studio always was the desired possibility. One of the additional things this provides is that any assets from Daz3D Shop can now be used in Blender. This means that all the figures, clothes, hairstyles, etc are now available to use in Blender.
Source Daz to Blender Bridge
In this article, we will be: looking at how to find and install the Daz to Blender Bridge and learning how to use it. Then introduce all the things that you can transfer and explain the advantages that this bridge brings. And in the end, we will have a small Daz Studio to Blender render comparison to see whether you can take advantage of Cycles too.
Installing Daz to Blender Bridge
Installing is very easy, as it is a free tool. Just visit the Daz to Blender Bridge page here on the Daz3D Shop. Even though the add-on is free, you still need to go through the whole process as if you were buying it.
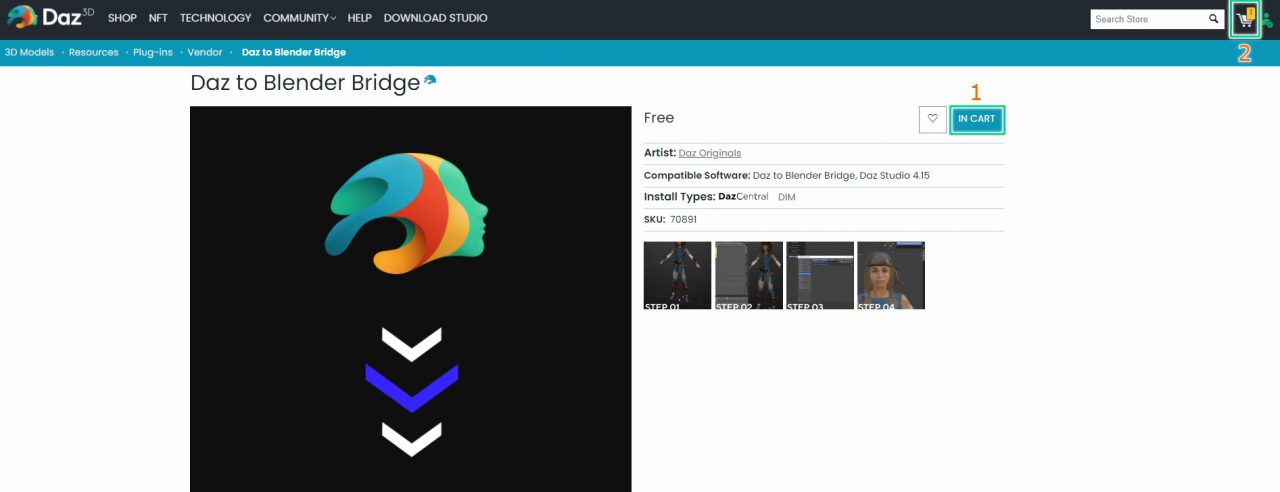
First, click “Add to Cart” and then proceed to the Cart in the top right corner. You need a Daz3D account for this, but it is the same account that you need for the Daz Studio itself.
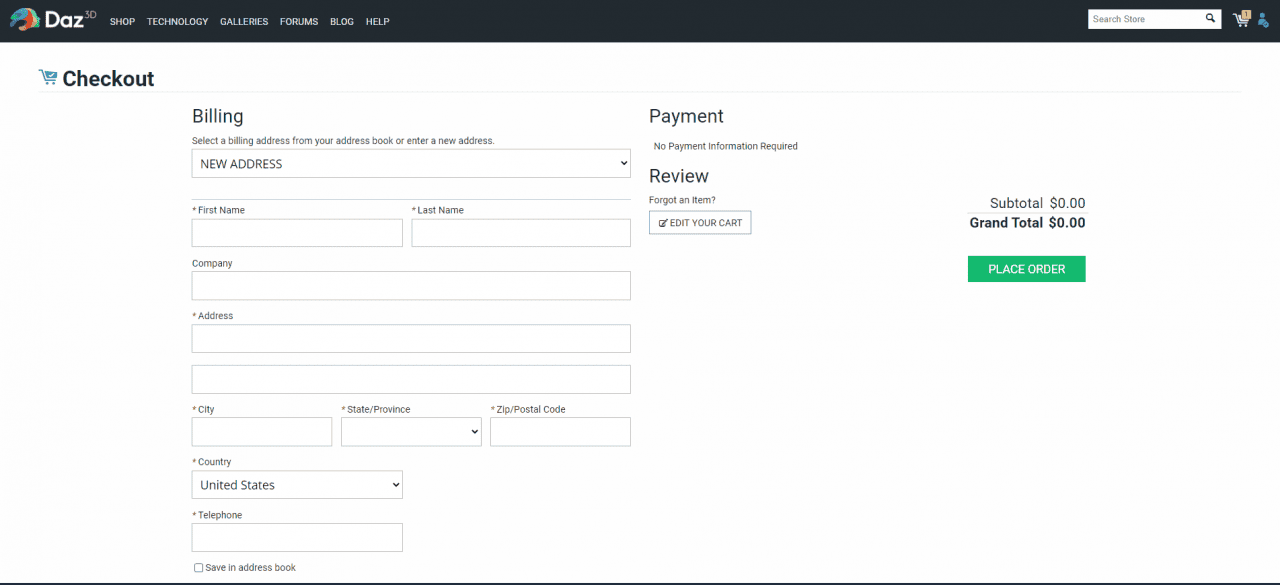
Next is the Checkout window. Here you will need to fill in all your billing information. This would not spend your money, but you need to provide this data to use the Daz3D Shop.
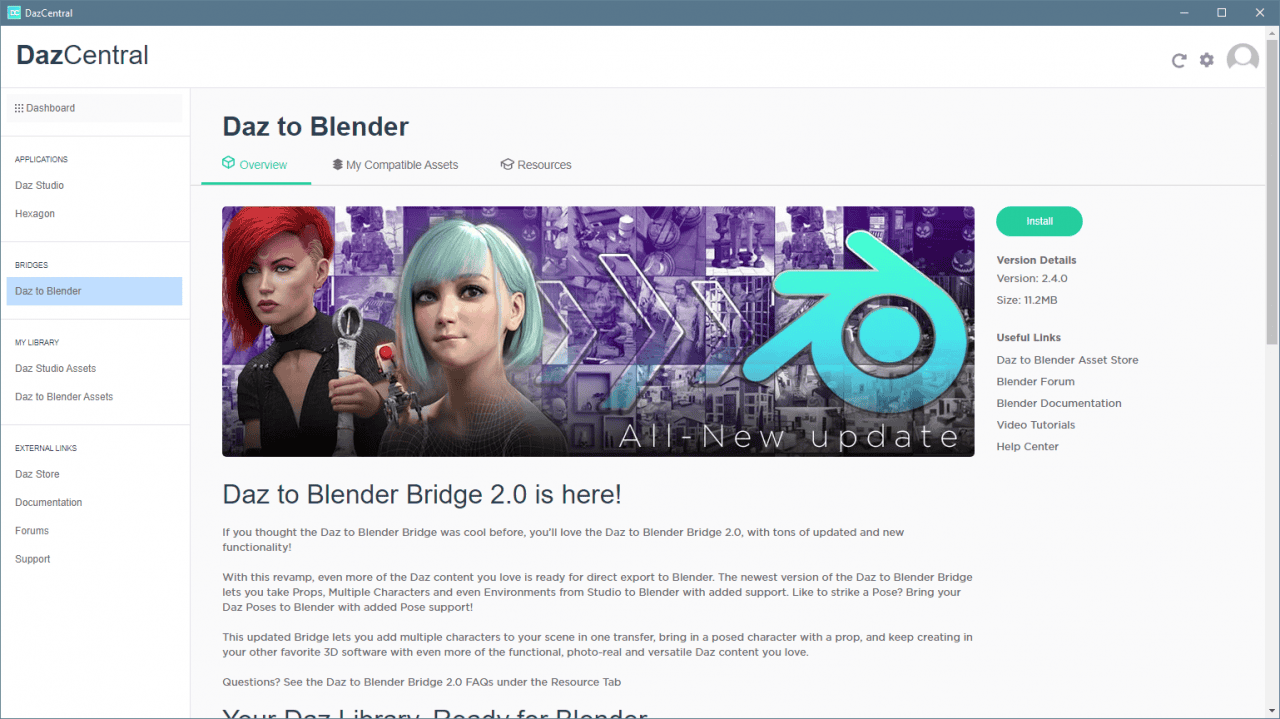
When this is done, you can close the site and proceed to install this add-on. For this, you will need to use either DazCentral or Daz Install Manager. I have used DazCentral: found the plugin in the “Bridges” section and clicked Install.
It is done, we have installed the Daz to Blender Bridge in the Daz Studio. But we are not completely done yet, as we also need to install it in the Blender too. You can download Blender from the official website for free without registration and then install it.
When Blender is installed, open it and proceed to the Edit > Preferences. In the opened window find the Add-ons section and search there for the DazToBlender option. Turn it on by clicking on the checkmark.
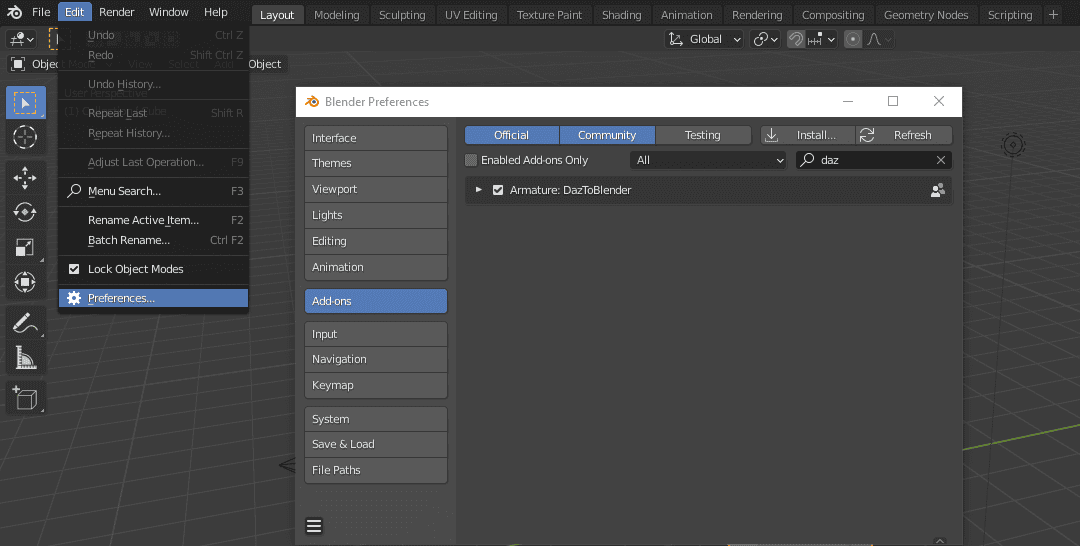
Now we should have the add-on installed both in Blender and Daz Studio and we are ready to work with it.
How to use Daz To Blender Bridge
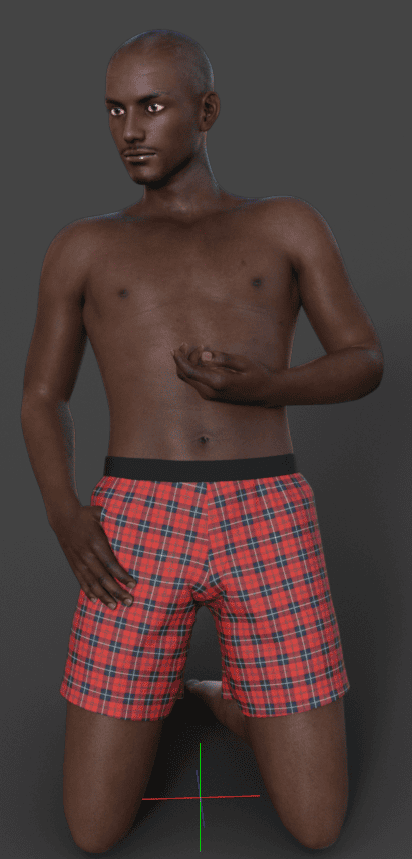
So let’s use the bridge. We will export a character from the Daz Studio and import it into the Blender. So first open Daz Studio and add a character to the scene.
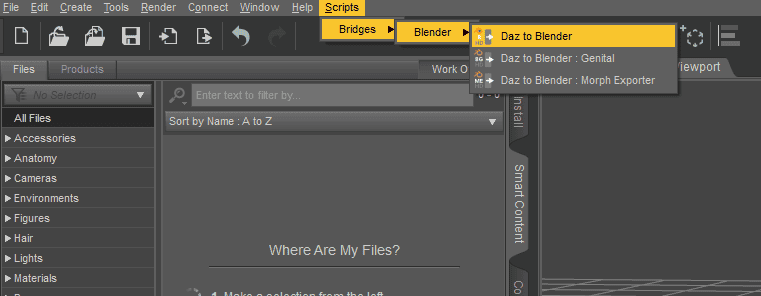
To export the character, you need to select it and go to Top Bar > Scripts > Bridges > Blender > Daz to Blender.
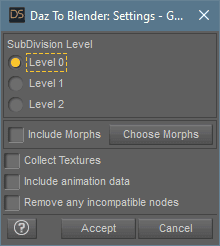
There is no need to change anything in the window now. We will look at some of the settings later, right now just click Accept.
Exporting will take a little bit of time. When it is done, you can proceed to Blender. No need to do anything.
When in Blender, to access the add-on we will need to open the side panel. It can be opened by either clicking on the arrow that is on the side of the Viewport or by pressing the [N] key on your keyboard. On the Side Panel, there should be the Daz to Blender tab available.

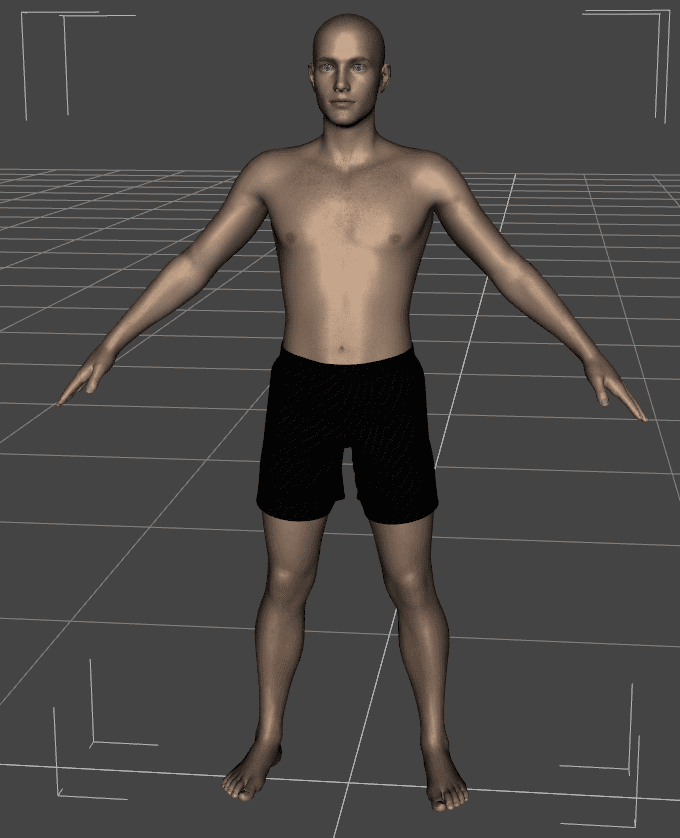
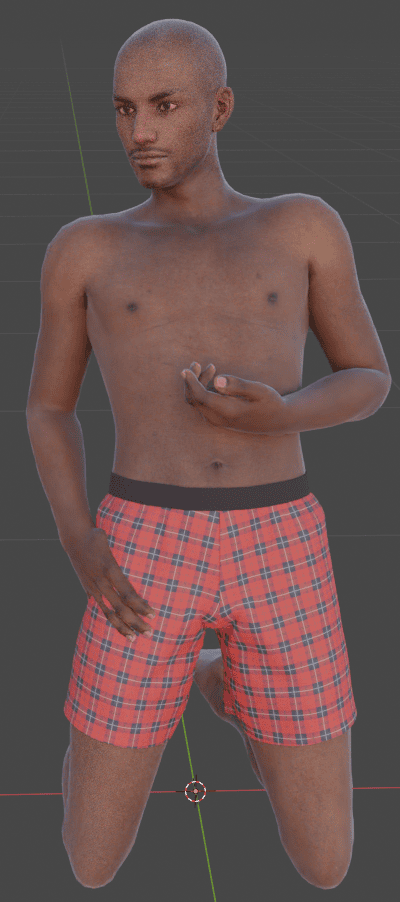
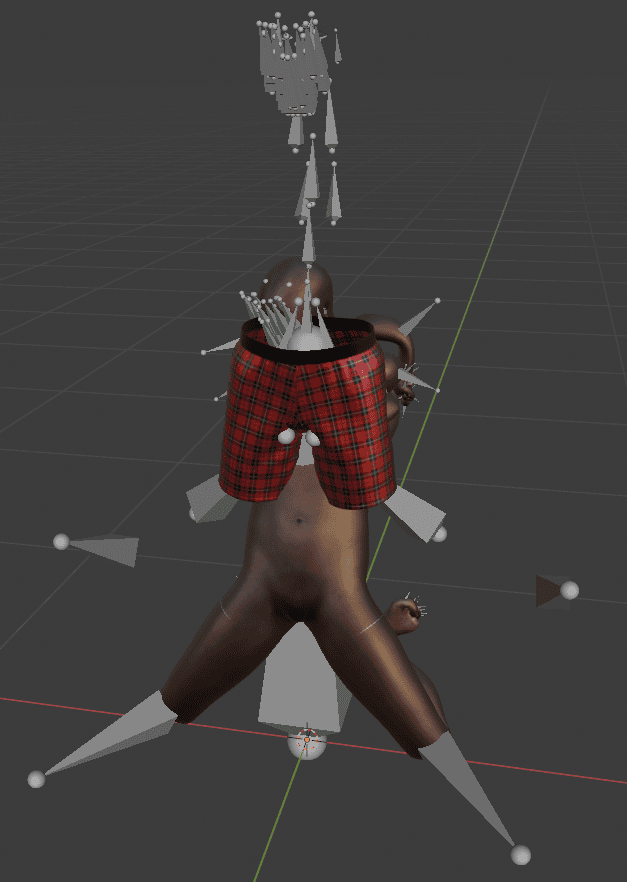
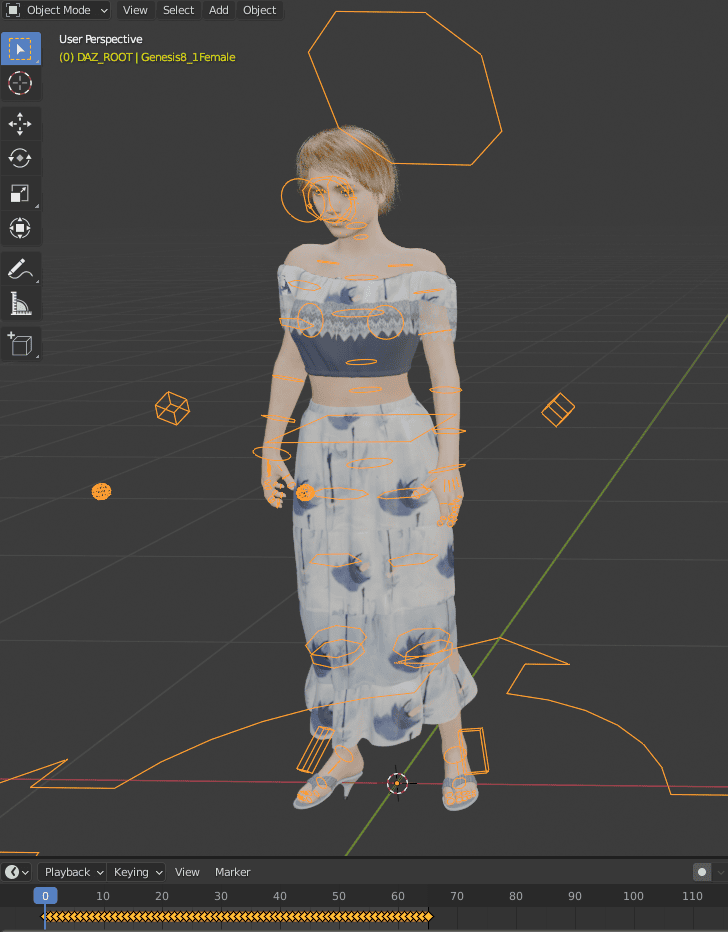
On the very top, there is an “Import New Genesis Figure” option. This is the one that we need. Click on it and accept. Importing will also take some time. Then you should see something like this:
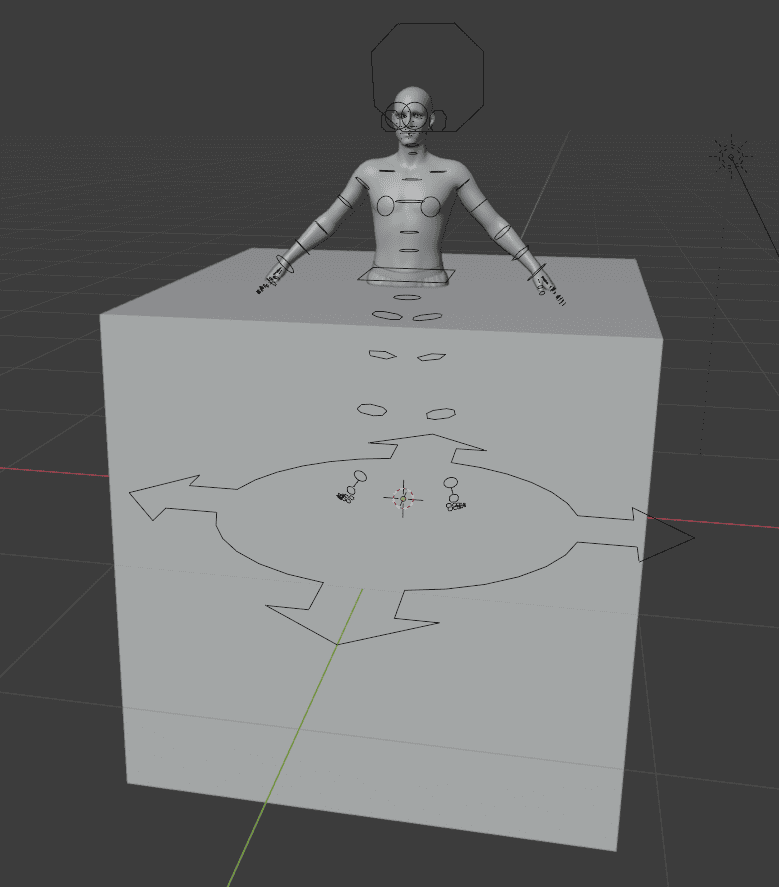
The character did import as it should. But it is inside the default Cube. In the future, it would be good to remember to clean the scene before using the Bridge. Though we can just delete the cube manually, no worries.
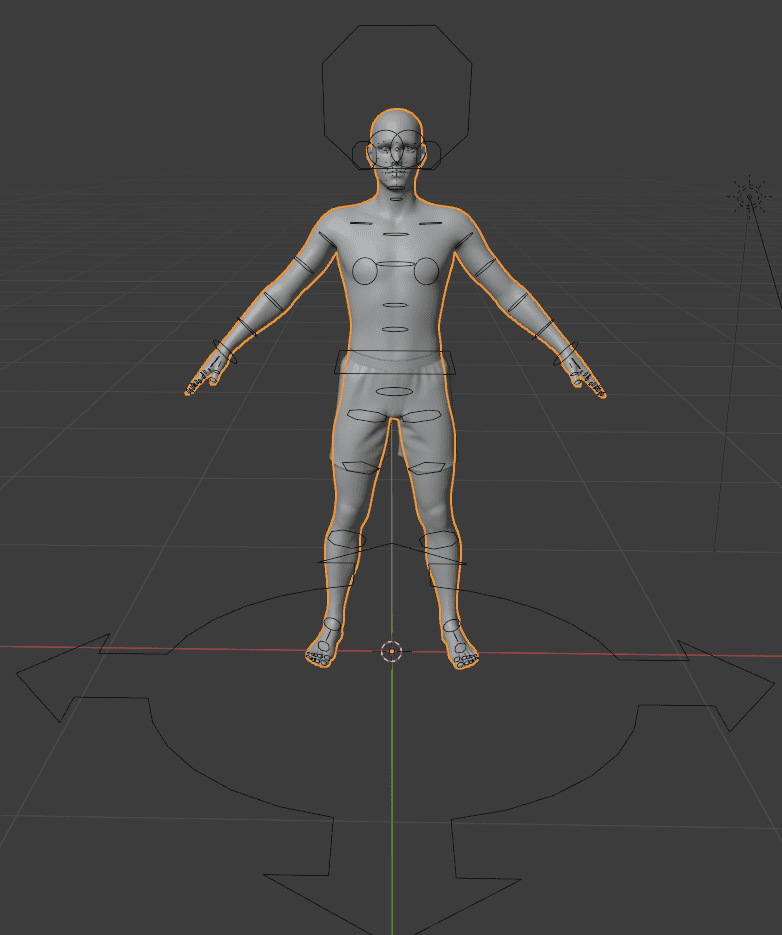
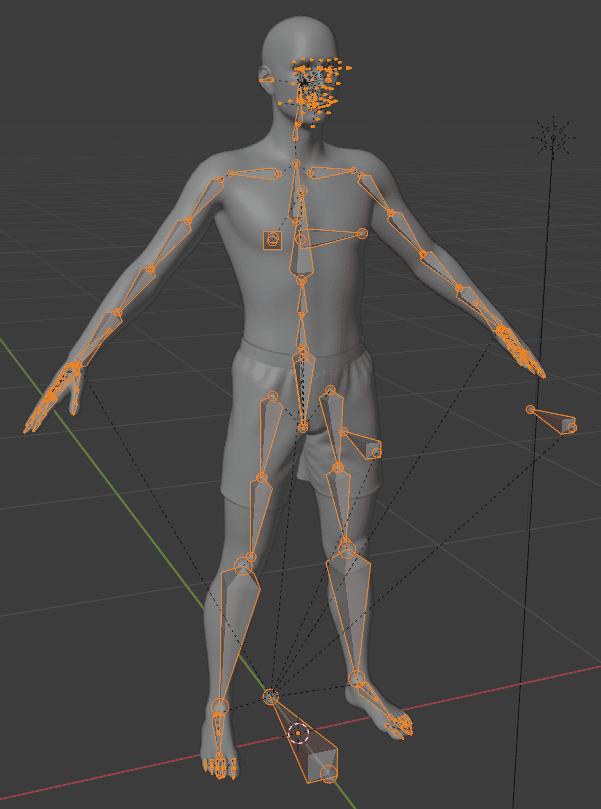
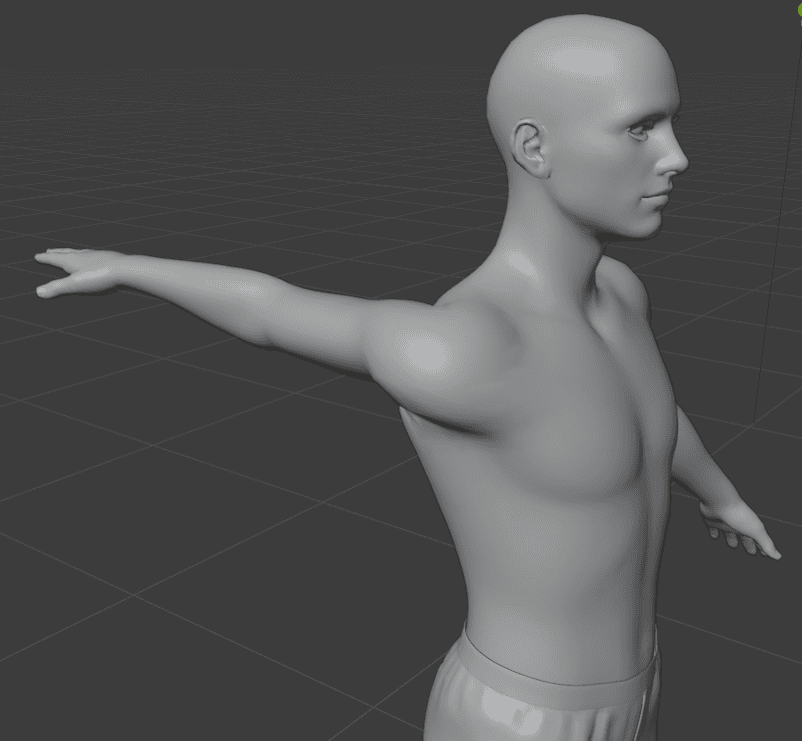
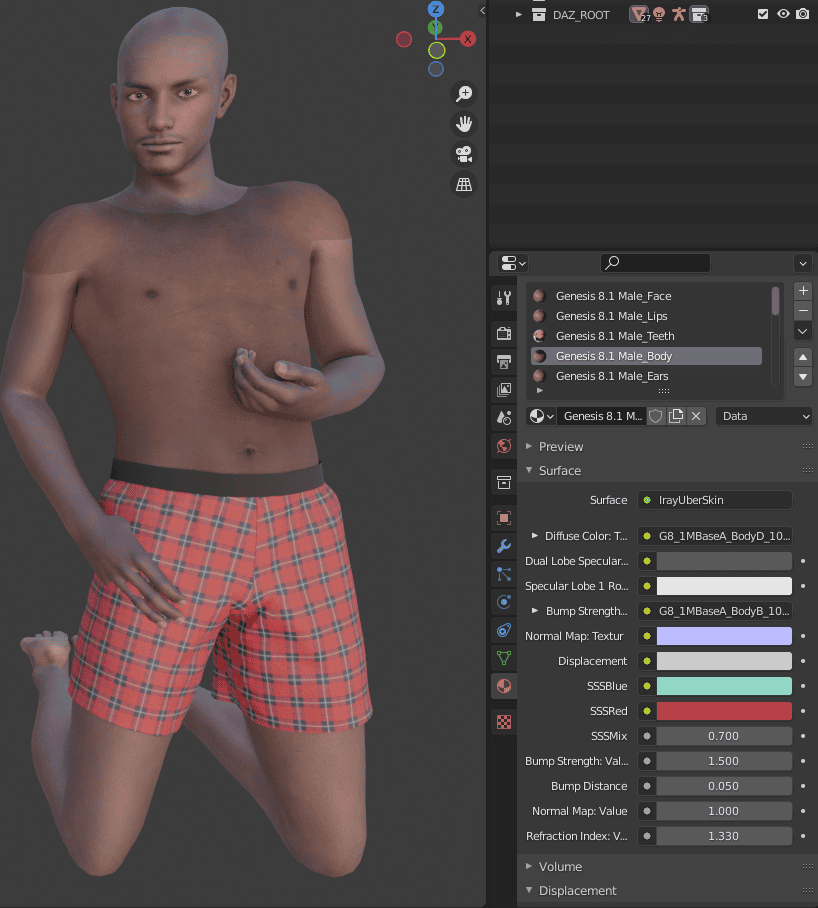
Here is the Genesis 8.1 Male figure. The exact one that we had in the Daz Studio, but now it is in Blender. One thing that is drastically different and is very noticeable is all the different shapes around the character. These shapes are the bones of the character that are needed for posing and animating. We will look at them later.
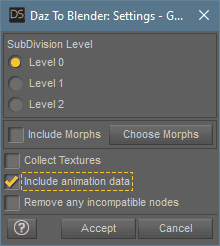
SubDivision Level
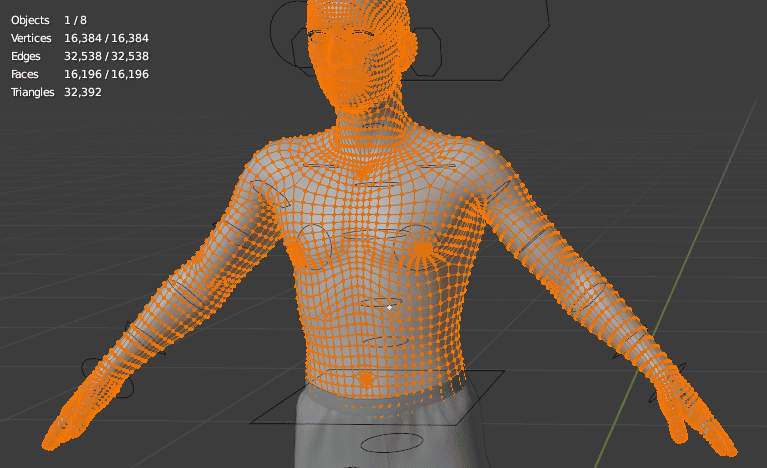
For now, let’s learn what SubDivision levels are. It is one of the settings that we had when exporting the character from the Daz Studio. It decides how high-poly the character would be. This means that it adds more polygons(faces). The character that we imported previously has 16,196 faces.
Let’s return to Daz Studio and export this character again. But this time change the SubDivision Level from 0. You can make it Level 1 or 2.
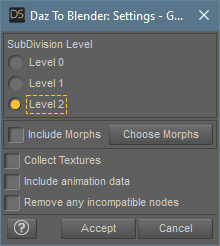
And then import this into Blender again. This time both export and import would take longer. In the end, you will see that the character has a lot more geometry to it. 259 thousand polygons opposing 16 thousand. That is 16 times as much geometry.
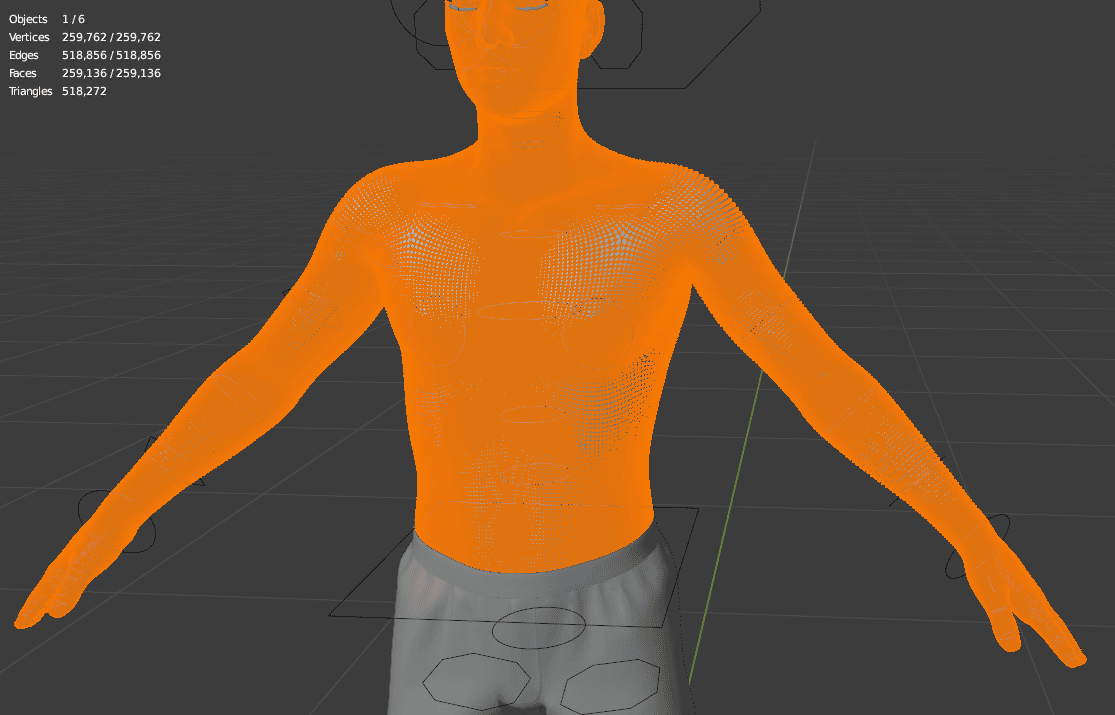
Adding more polygons can be both a good thing and a bad thing. Pro is that adds more geometry to the object and makes it more detailed. So high-poly objects look realistic and have many details. Plus adding even more details should not be a problem. On the other hand, the more faces there are – the harder it is for a PC to handle this. It will take longer to do anything with the scene and it will impact rendering times drastically. So always maxing this out is not the best solution and you should consider what would be best for your case.
Daz to Blender Bridge Posing
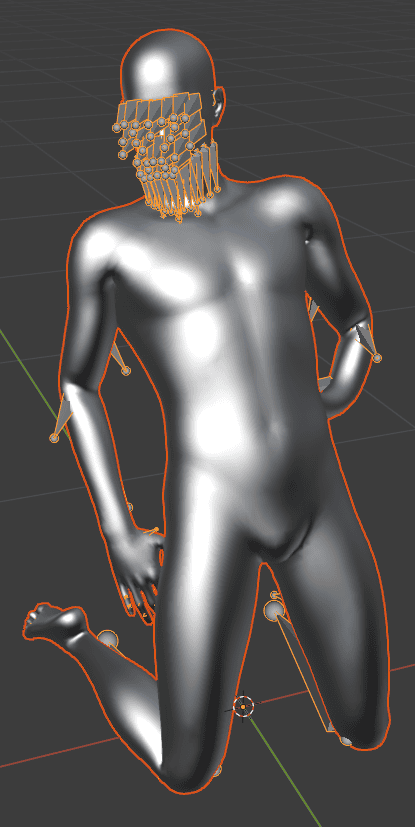
Back to the shapes around the character – the bones, as we already established. They are very different from how regular bones look. This is done for easier use by the public. We will see how this works further down the article. If you enter the Edit Mode, you will see that in reality, all the bones look like a regular Blender rig.
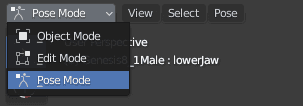
To work with bones and pose a character, first of all, you need to select them and then change the viewport to the Pose Mode on the top left corner.
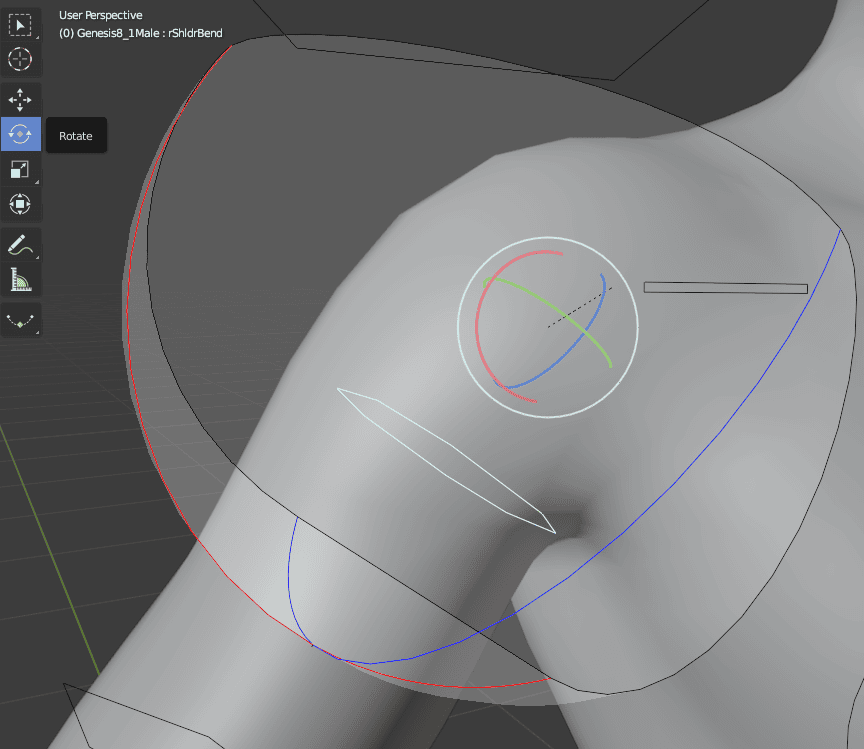
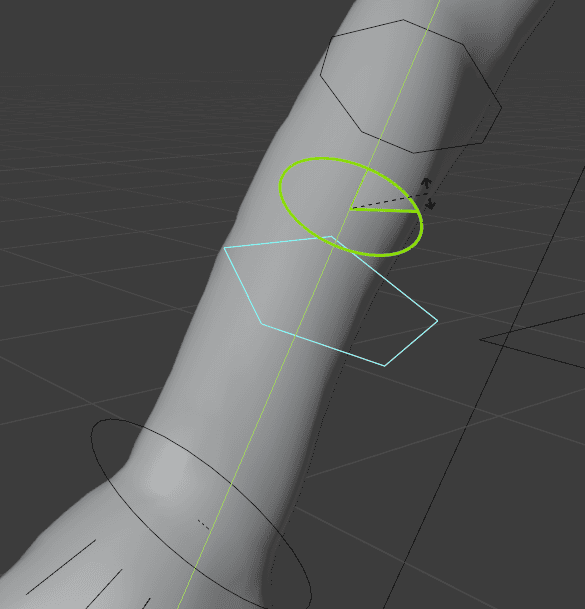
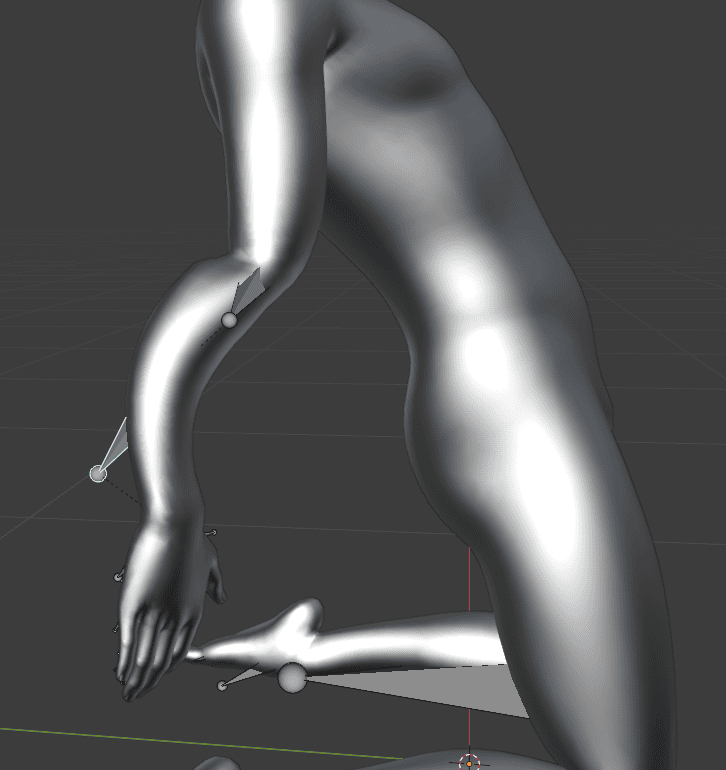
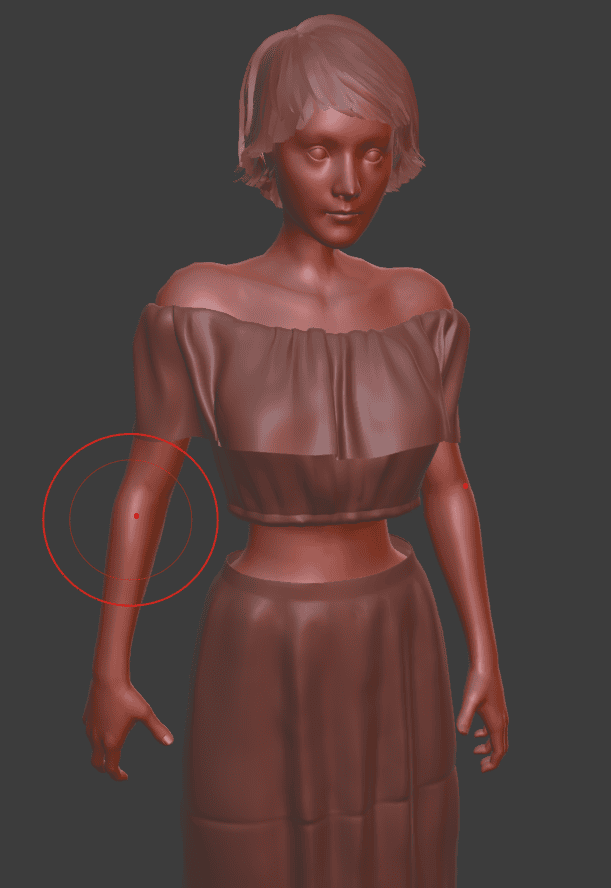
In this mode, you can click on any of the bones and transform them to change the pose of the corresponding part of the character. Mostly, bones are rotated for posing. For example, you can click on the shoulder bone and you will see something like this:
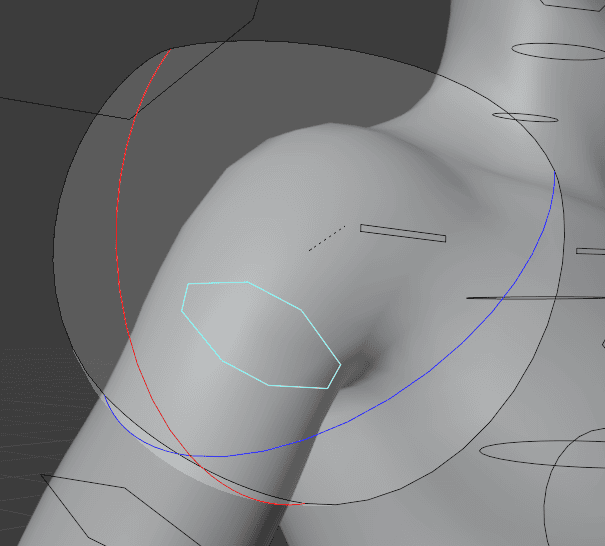
Selecting a bone created a special gizmo dome around. You can’t do anything with it, it is just to visualize the limits of transformation for this bone.
So each bone has special bounds applied to them. These limits help you to create a believable pose because if they were not there, it would be easy to create something like this:
But when the limits are active, you can only transform the bone inside this gizmo that you see on the screen, which avoids unnatural poses.
To start transforming bones, you need to rotate them. This can be done by either pressing the [R] button or using the rotate tool on the left of the viewport. When the tool is active, you will see the rotational axis appear on top of the bone:
Now you can drag any of the three colored lines to move the bone on the corresponding axis. As you can see, the lines on the rotation tools match with the lines on the bone gizmo. This is additional help in posing.
So when you rotate along one of the axis, the bone will move along one of the colored lines on the gizmo. For example: when rotating along the X-axis, bone moves along the red line, as it corresponds to X-axis.
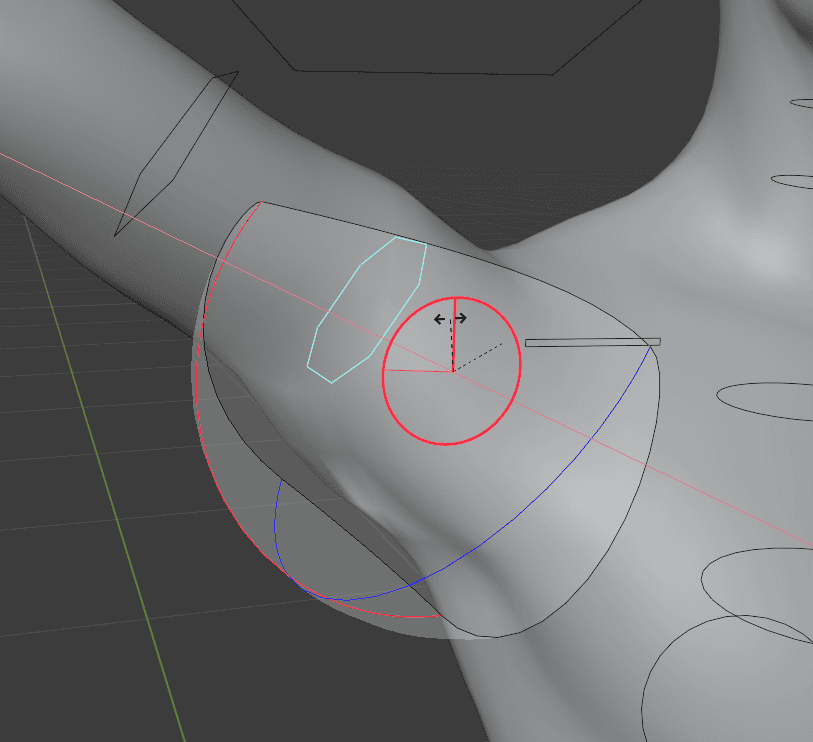
Based on these lines, you can see which parts of the character can be transformed in which way. So when you select a bone and only a red line appears, this means that the bone can only be rotated along the X-axis.
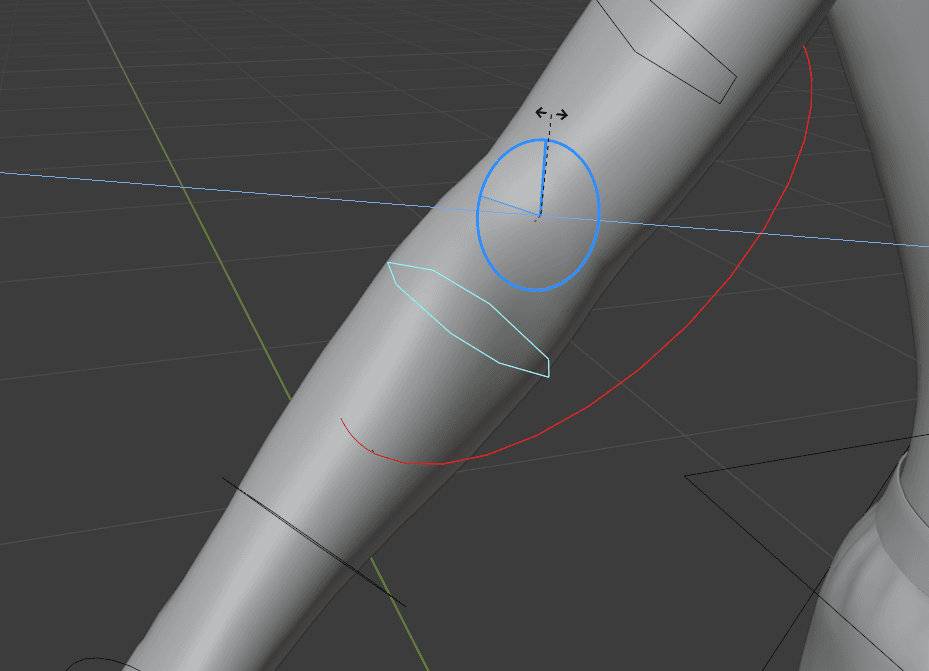
Rotating along Z does nothing
Though the Y-axis is an exception from this rule. Usually, it is not presented as a colored line at all, but you still can transform it on the Y. Often the Y-axis transformation is only available for the bones that have to gizmo at all.
Transferring Poses
Instead of transferring a character in a default pose and posing it in Blender, you can transfer the character already with the pose applied. Then you can use Blender to modify the pose if needed. Or to do something else entirely.
Back in the Daz Studio, apply any pose to the character and export the with the Bridge. No need to change anything else.
And then import this into the Blender. Again, stuff as usual, nothing changes in the process. It transfers to Blender just like that with the pose applied:

This should work with any pose. Just apply it in the Daz Studio before using the Daz to Blender Bridge.
Daz to Blender Materials
Another major thing is Materials. For now, we have only looked at the poses and bones, but what about textures and materials? They are important for the look of the character and it is vital for them to transfer properly.
If you have ever used an older version of Daz to Blender Bridge, there were some problems with this aspect. Materials looked weird, the skin was more like wax than the skin, and so on. So did this get fixed? Let’s turn on the Material Preview shading in the viewport and see for ourselves:
Material Preview Shading in Blender
It looks really good as for the Material Preview – everything is realistic and nothing looks out of place. Remember, that this is only the preview shading with the Eevee renderer, which is similar to the Filament in the Daz Studio. We have a Daz3D Filament Tutorial and Blender Eevee vs Cycles if you want to learn more about any of those.
Here is how the character looks if we turn on the main rendering engine, Cycles:
Works perfectly fine. But this is an example with all default materials and textures. What if we go back into the Daz Studio and change them. I have changed both the character texture and the shorts. Note, that both the character and shorts are the same objects as before, I have just changed the material.
Changed textures in Daz Studio
Now we use the Daz to Blender bridge to transfer this scene. Let’s see what we have in the Blender:
It worked great. All materials have been transferred with the changes. It is just important to always apply all changes before exporting characters from the Daz Studio.
Editing Materials in Blender
Instead of changing materials in Daz Studio and exporting the character like this, you can instead import the object in Blender and use it for material editing purposes. Select the character and open the Material Properties tab.

In this tab, we can see that there are a lot of different materials. One for each part of the body basically. It is done the same way in the Daz Studio. Also, we can see that there is a unique “IrayUberSkin” shader that is created when transferring.
Here you can select any material and change it. For example, I have changed the Dual Lobe Specular and Specular Lobe Roughness for the Body part. This way it is not as reflective and specular anymore.
Though you can see the problem right away: this has changed settings individually for the body and nothing else. So right now the body part is different from the rest and if I want everything to match, I need to individually go through parts and make the same changes.
Thankfully, it is not the only way to change the material. You can handle these materials by using the built-in function in the Daz to Blender bridge. It is situated near the top.
Here you can change the value of the selected setting. For example, I have Base Color Hue selected. So I can press Up to increase the Hue for the whole character skin or Down to decrease.
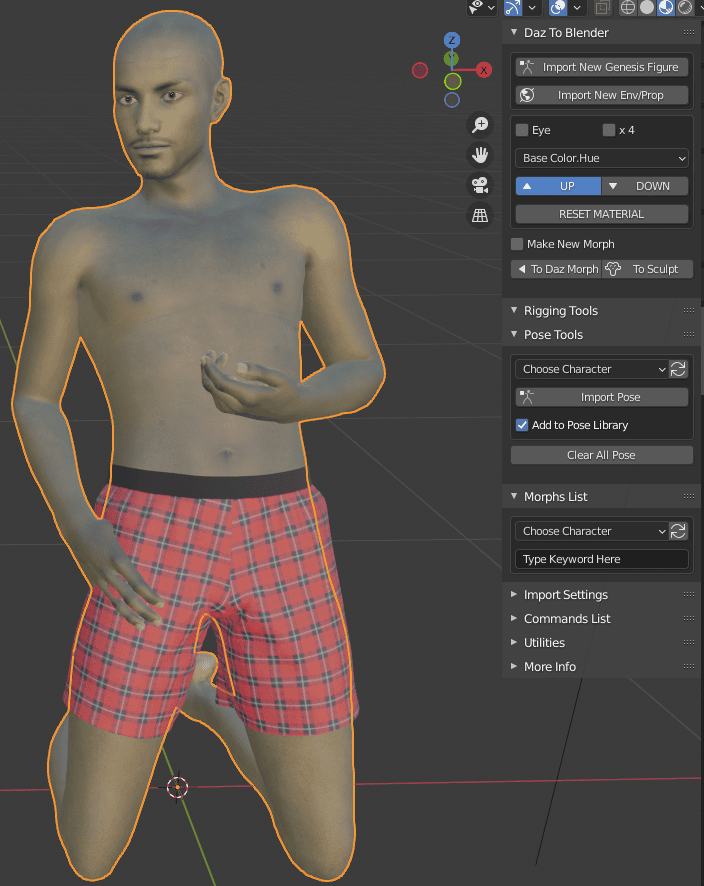
Increased Base Color Hue
Just like that, by increasing the hue I have made our character green. Though what I really wanted to change were Roughness and Specular settings. Chose them on the list and did just that.
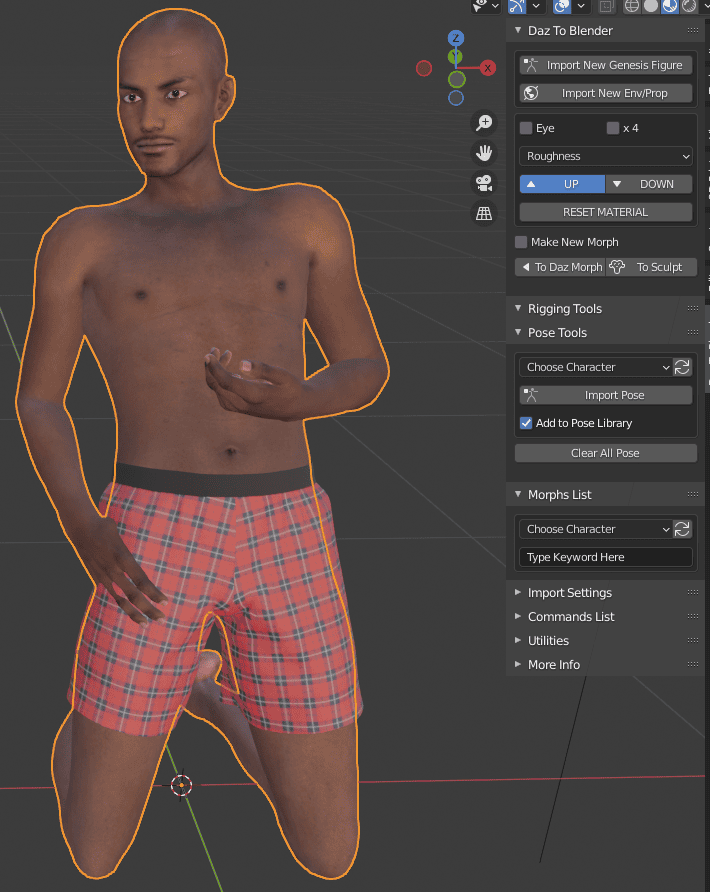
I like the look of the character more now. A very straightforward way of changing the material. And a lot more convenient than changing them one by one manually in the Material Preferences.
Daz to Blender Bridge vs Regular Export
How about a quick Daz to Blender Bridge comparison to another, more traditional way of export? Usually, if not using the Bridge, you would export the character as a file and then import this file into Blender.
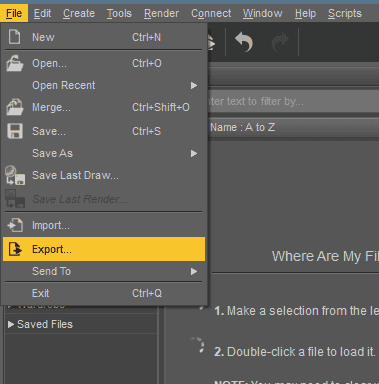
As we want the character to have materials and rig, the best file format for this kind of export would be .FBX. I select the character in Daz Studio and go to File > Export.
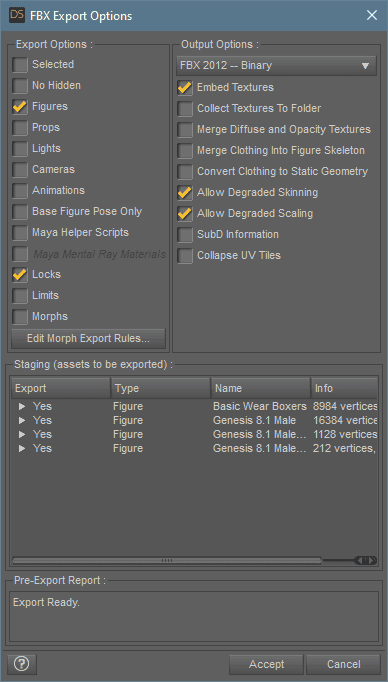
Then I choose the path to where I want this file saved. And also make sure to change the file format to .FBX. In the Export Options, I make no changes. Maybe you can make this export better, but it would not be a fair comparison to the Bridge then, as there we did not change anything.
Click Accept and this will save the file. Then proceed to Blender. Here, open a blank scene and go to File > Import > FBX.
Find the needed file on your computer and bring it to the scene. In my case, the result is terrible:
Nothing matches the initial scene. Bones are chaotic, so is the pose. Clothes are not on the character and instead float in the air. At least we have materials, but they look weird and way too reflective.
If we go back a step and use our Daz to Blender: Step by Step Tutorial to export and import the character, I have managed to make it work a bit better. If exported without any additional assets, here is the result:
So this way, the pose is much better and there are fewer problems. But it is still quite bad – the pose does not match the one we had in Daz Studio. And bones are harder to work with. There are no limits on bones, of course, so it is difficult to create a believable pose.
Overall, the FBX method is inferior to Daz to Blender bridge in practically every way imaginable. Everything imports worse and it is a lot more work to make it do somehow. Especially as using Bridge would be much simpler.
What Can You Transfer with Daz to Blender Bridge
For now, we have only imported some most obvious things: the character itself and the pose. But what else can you transfer? Let’s see.
First of all, we can transfer all the assets that are connected to the character. We have already seen that when shorts were transferred with previous characters. But this applies to not only shorts.
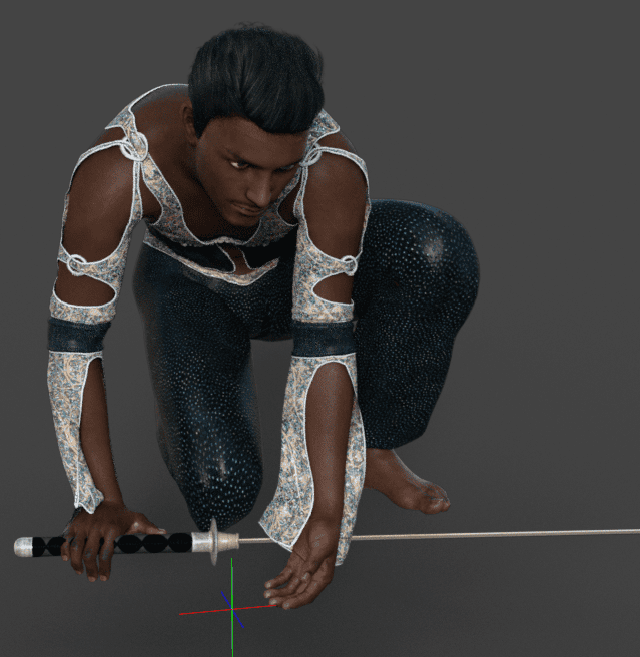
Above is the character that has a lot of assets connected to them. This includes hair, clothes, and even a sword. Below is how it looked, when transferred to Blender.
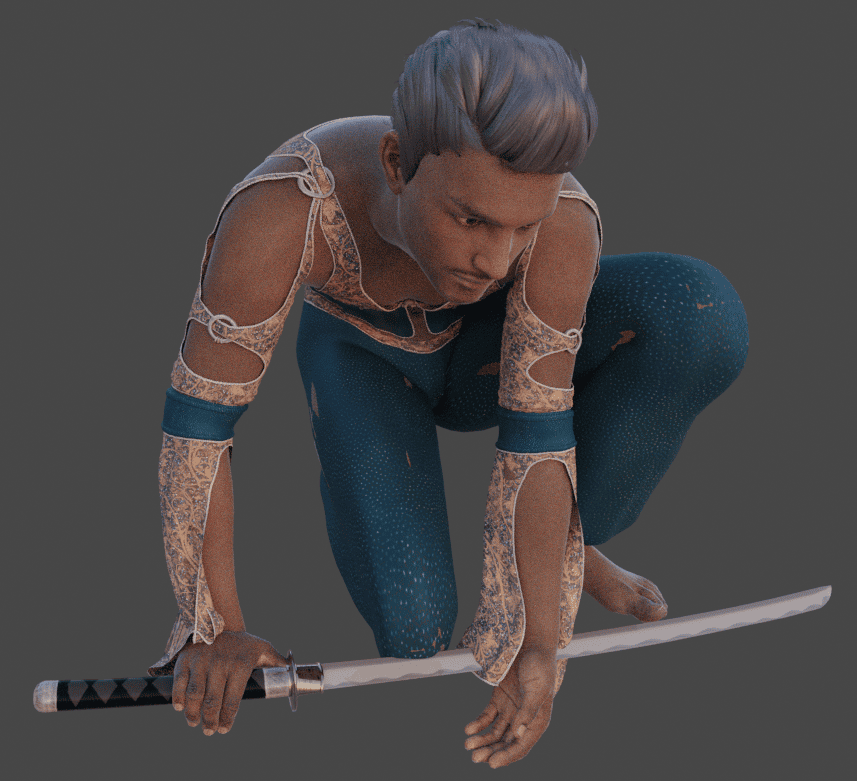
Everything transferred correctly. Again, no problems except some small tears in clothes and inconsistencies in color. Though it is important to note that most of the assets applied to the character were not even meant for this figure and your own results would probably be even better.
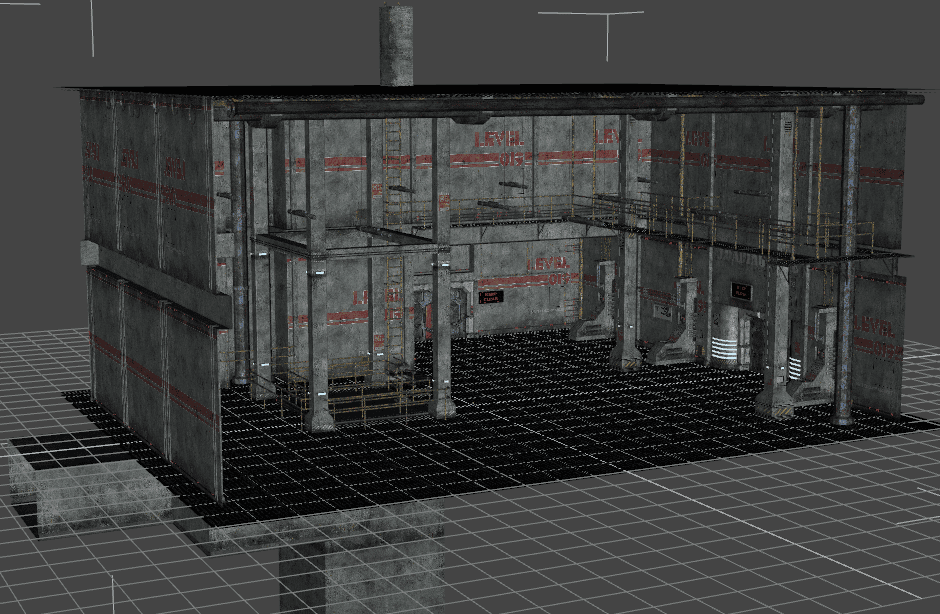
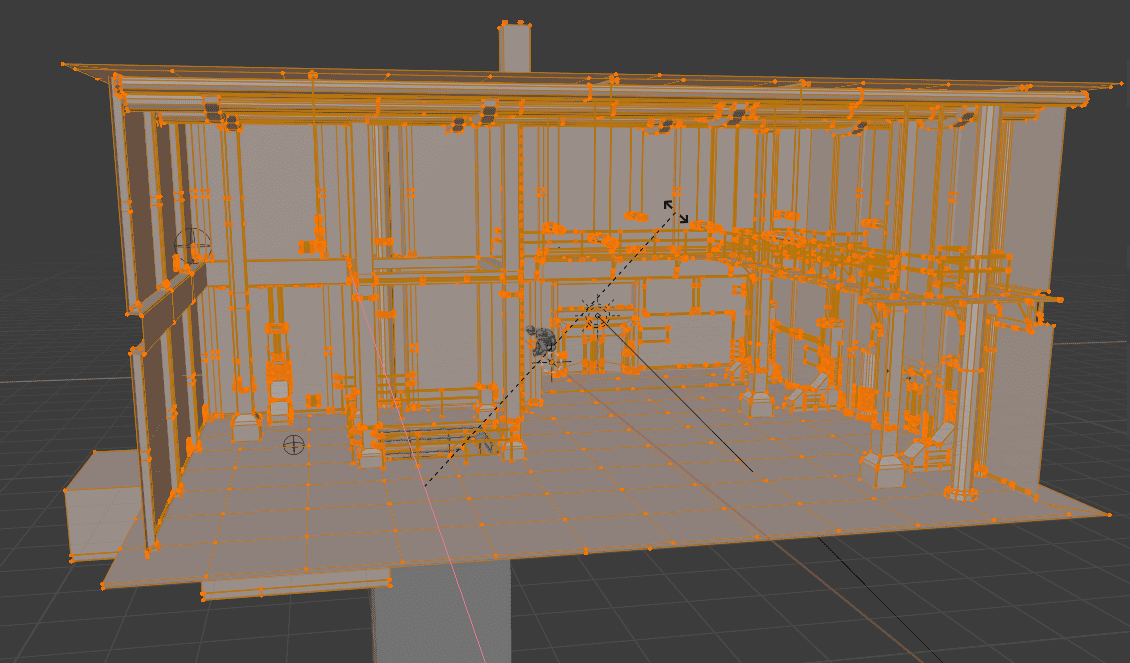
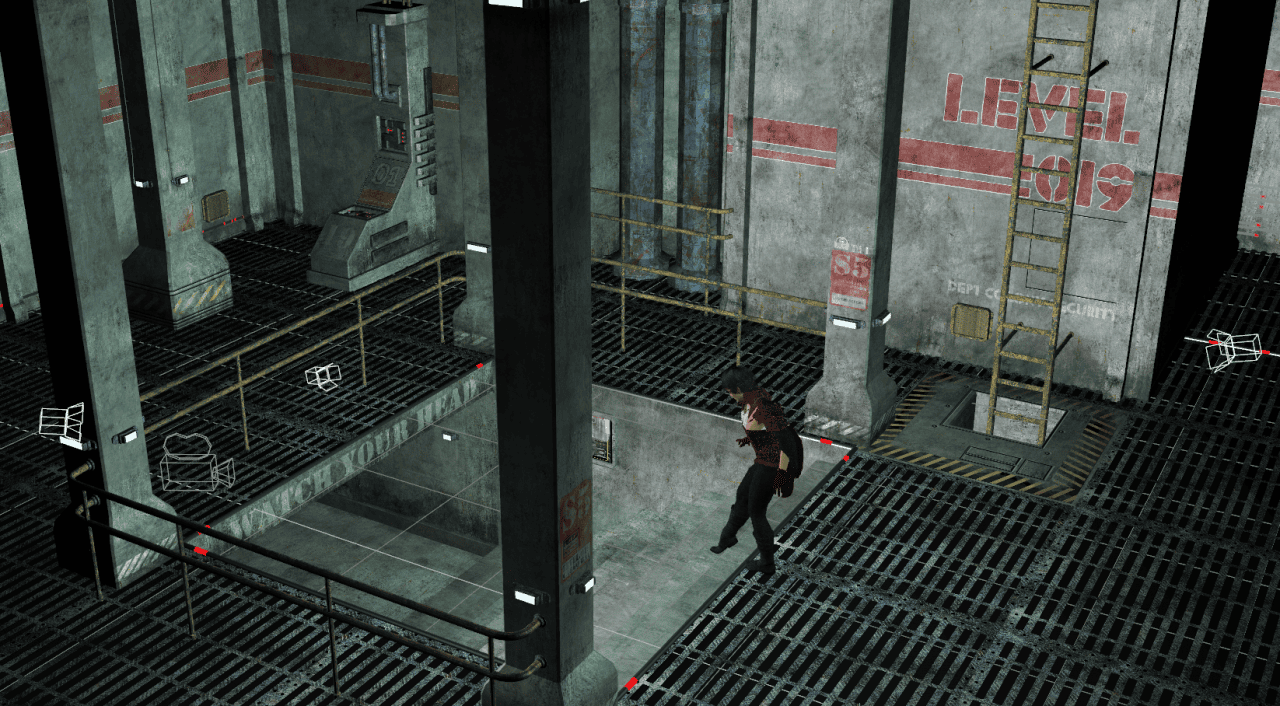
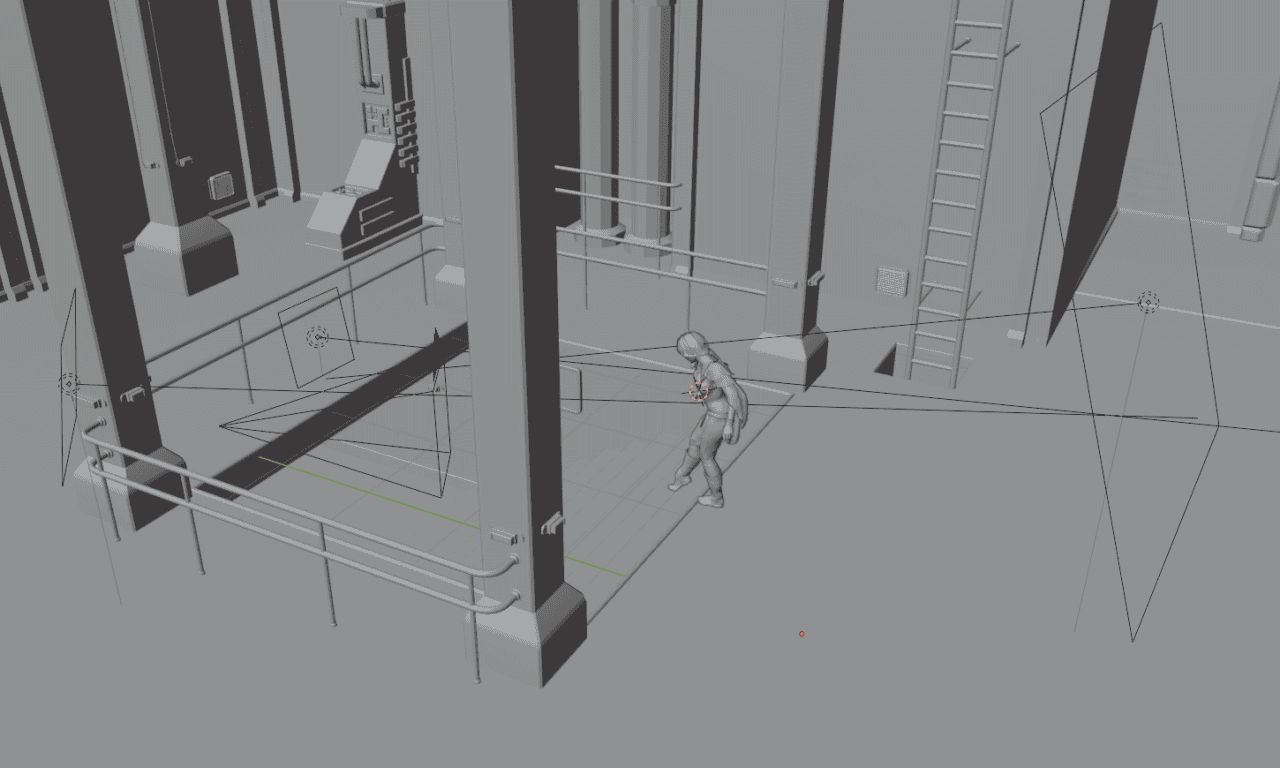
Other things that we can export are props and environments. For example, here is the free Level 19 environment in the Daz Studio:
You export this just as we did with the character: select the environment, and go to Scripts > Bridges > Blender > Daz to Blender. It should automatically understand that it is an environment and export it. If not, you should choose that yourself.
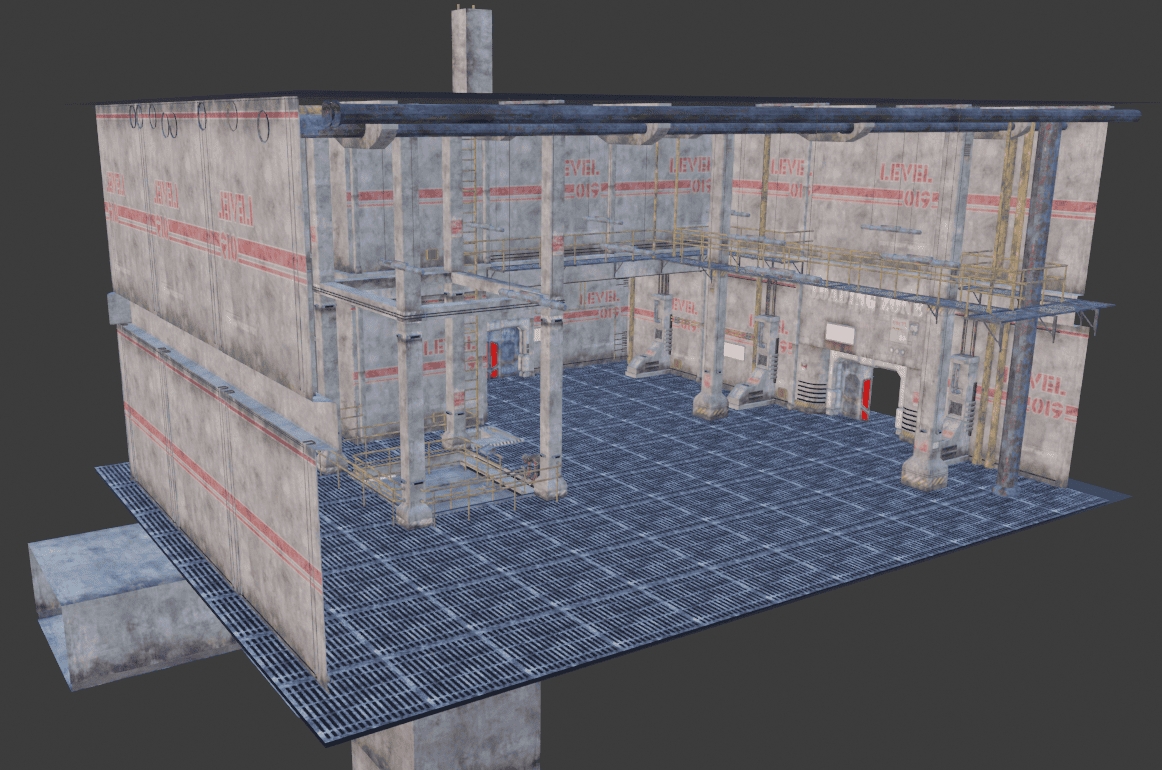
Then I opened Blender and used Daz to Blender Bridge to import it. Pressed the “Import New Env/Prop” button.
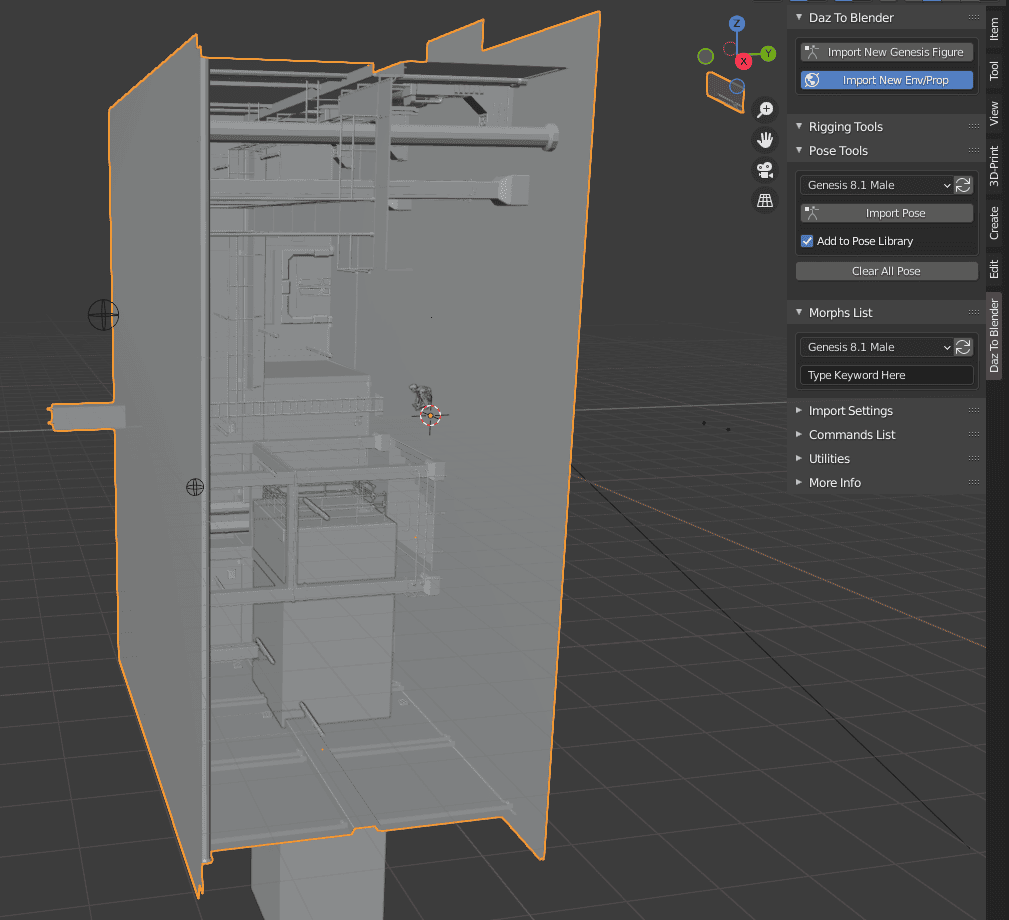
As you can see, there is a problem with the current build of Daz to Blender Bridge. It rotates the environments while transferring. This persisted with a couple of different environments.
Though worry not, as it is easy to fix this problem. Just select the environment object, go to the Edit Mode, select everything and rotate it for 90 degrees.
A nasty bug, but I hope that it will be fixed soon. When the environment is in place, we can also see that all textures and materials have been transferred, the same as it was with the character.
Transfer Animations
Another major thing that you can transfer from the Daz Studio into Blender is animations. So let’s open Daz Studio, create a character, and add some animations to them.
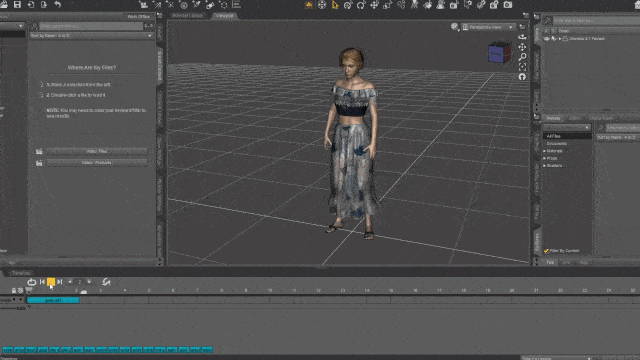
If we use Daz to Blender bridge on this character right now – it will not save any animation data. This is because the current animation is an aniBlock instead of keyframes. To learn more about aniBlocks and how to handle them, you can read our Daz3D How to Edit aniBlock Sequences article.
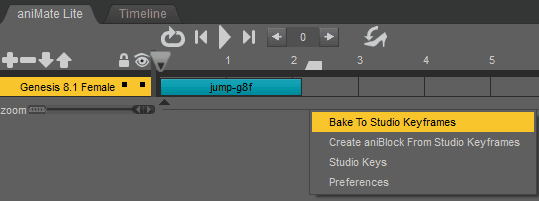
What we need to do is Bake this aniBlock into Studio Keyframes. You can read about that in the article we linked above. In short: right-click somewhere on the aniMate surface and select “Bake To Studio Keyframes”.
Only after this, you can export the character using the Bridge. Though if your animation was already a keyframe animation, you can skip everything just mentioned. Remember to check the “Include Animation Data” box, when exporting.
No need to do anything additional when importing this character into the Blender. When the import is done, you should see animation keyframes on the Timeline when the bone rig is selected.
Also, you can play the animation and see that it transferred successfully:
This should work with any animations and aniBlocks from the Daz studio. Not difficult at all.
Reasons to use Daz to Blender Bridge
So you may think about why you would even need Blender? Let’s talk about what it can offer you that Daz Studio can’t or what it just does better.
The first and main thing to mention is modeling. There are basically no modeling possibilities in Daz Studio. Any ways you can edit geometry are not very convenient. Here is where we take a look at Blender – the main purpose of this software is modeling. It is the field in which Blender Thrives.

Editing a figure
Besides the traditional modeling, there is also Sculpting available in Blender. It is an easier way to work with organic shapes. It can be very useful for changing the shape of a character. We have a lot more on this in our Blender Sculpting Tutorial
Sculpting details on a figure
These changes then can be used as morphs in Daz Studio. Like we did in the Daz3D Create Custom Morph Tutorial.
We already touched on the next way you can use Blender – posing. We saw how convenient it is to use the rig in Blender. Overall posing is very convenient and arguably easier and better than in Daz Studio.
Posing figure in Blender
And as posing is so convenient – then animation is too. As animation is basically just a combination of several poses. Besides, animating tools overall are much better in Blender and easily accessible.
Rendering Iray vs Cycles
Another reason why you would transfer to Blender that may be the most important thing for some people is rendering. Are there benefits rendering-wise in bringing your scenes to Blender? We have already seen some examples, but those were not proper renders and instead were just quick previews.
In both Daz Studio and Blender, there are two rendering engines. The main ones are Nvidia Iray and Cycles and those are the ones that we will be comparing. But there are also Filament and Eevee, which are mainly used for previewing scenes and are not as good for realistic renders. I will example those too, just for the sake of it.
First of all, we need a scene that we are going to render.
I am using a free Level 19 environment that we have already used today. On the scene, there is a Victoria 8.1 figure with the Dark Storm outfit applied. The scene is lit by the simple HDRI and a three-point lighting setup. Just like we introduced in the Daz3D Iray Lighting Tutorial. Then I have rendered it:
Daz Studio render. 310 iterations in 10 minutes.
Renders in Daz Studio can run almost infinitely. So instead of doing that, I have stopped the render at exactly 10 minutes, we can see the result above. I don’t notice any noise on the scene, so I consider this to be a good render.
Then I needed to export all this into Blender. Thanks to Bridge, there were no problems with the environment and a character, we already know how that is done. Matching an HDRI for lighting was also easy. But setting up the three-point lighting is more difficult.
As there is no way to transfer lights, I needed to manually copy the scene. Copying transformations was easy, as I literally used the location and rotation data from Daz Studio and it worked. But with the power of the light – the only thing is to eyeball this.
Daz Studio uses Lumens for lights and Blender uses Watts. There is no good way to convert from one into another. Other lighting settings such as Color, Spread, and Size were easy to copy. In the end, this was the render:
Cycles render. 600 samples in 10:30
Rendering in Blender works differently. You must decide how many samples you want before starting the render. I tried to guess this to match the 10 minutes mark and almost got it right. Even though 600 samples in Blender sounds like twice as much as 310 iterations in Daz Studio, this is not totally true. You see, each rendering engine is unique. Samples in Blender do not equal iterations in Daz Studio, you can’t compare them like that.
Overall, speed-wise I would say that Cycles is faster. It is very hard to say for sure, as I have already explained. But at least because Cycles can utilize both your CPU and GPU power at the same time makes it a faster rendering engine. Besides, Iray is infamous for its slow renders, so it is not a big surprise.
Look-wise I tried to match everything as well as I could. In the end, they look different and that was to be expected. Cycles render looks more vibrant and colorful, while Iray is more down-to-earth and realistic.
Another thing to notice is that some materials do not match. This is especially noticeable with shoulder pads and boots. In Blender, they are not as shiny and metallic. They were transferred like that. So it is one of the differences that you should just accept.
Earlier I have mentioned that we will also look at the Eevee and Filament, so let’s do that. Starting with the latter.
Daz Studio Filament capture
The Filament is a pure example of a preview rendering engine. It is supposed to be used exclusively in the viewport. There is no proper option to render a scene with Filament, instead, I have made a manual capture of the viewport.
Also, there are no rendering times. Switching from the Texture Shaded into Filament is very fast, a couple of seconds only. Though the result does not look the same way it was intended. The environmental lighting overexposes everything. At the same time, none of the spotlights produce any lighting at all. There are very few settings to control the look of FIlament. Overall, you can learn more about this engine in our Daz3D Filament Tutorial.
In Blender, there is an Eevee rendering engine:
Blender Eevee render. 200 samples in 30 seconds.
Unlike Filament, Eevee is not meant to be used exclusively for previews. Overall, compared to Cycles: materials don’t look as realistic and lighting is a lot more simple. But it is a decent rendering option, especially considering the speed at which you can dish out these renders – this one only took 30 seconds to produce 200 samples.
If your scene is made to be rendered in Eevee and is optimized around it – you can get some very nice renders, when there is literally no need for Cycles or Iray. This is especially true for more stylized looks than realistic ones.
If we speak truly, there is also one more way of rendering in Daz Studio – the 3Delight engine. Though it is a very old engine that has very little use nowadays. Everything about it is worse than Iray, Cycles, or even Eevee.
Daz Studio 3Delight render.
As you can see, the lighting looks very bad. This is also true for materials, moreover – skin material went missing altogether.
In conclusion: Blender did pleasantly surprise me, as Cycles render looks quite good and even can compete with the Iray one. And it is important to understand that Iray has a huge advantage, as it is in the home field here. Meaning that every single object, material, and texture on the scene was made to be rendered with Iray and optimized around it. And Blender still managed to show some very good results.
Looking for 3D Models?
Checkout also many of our Daz3d Product Highlights from the Daz Store, here some examples below:
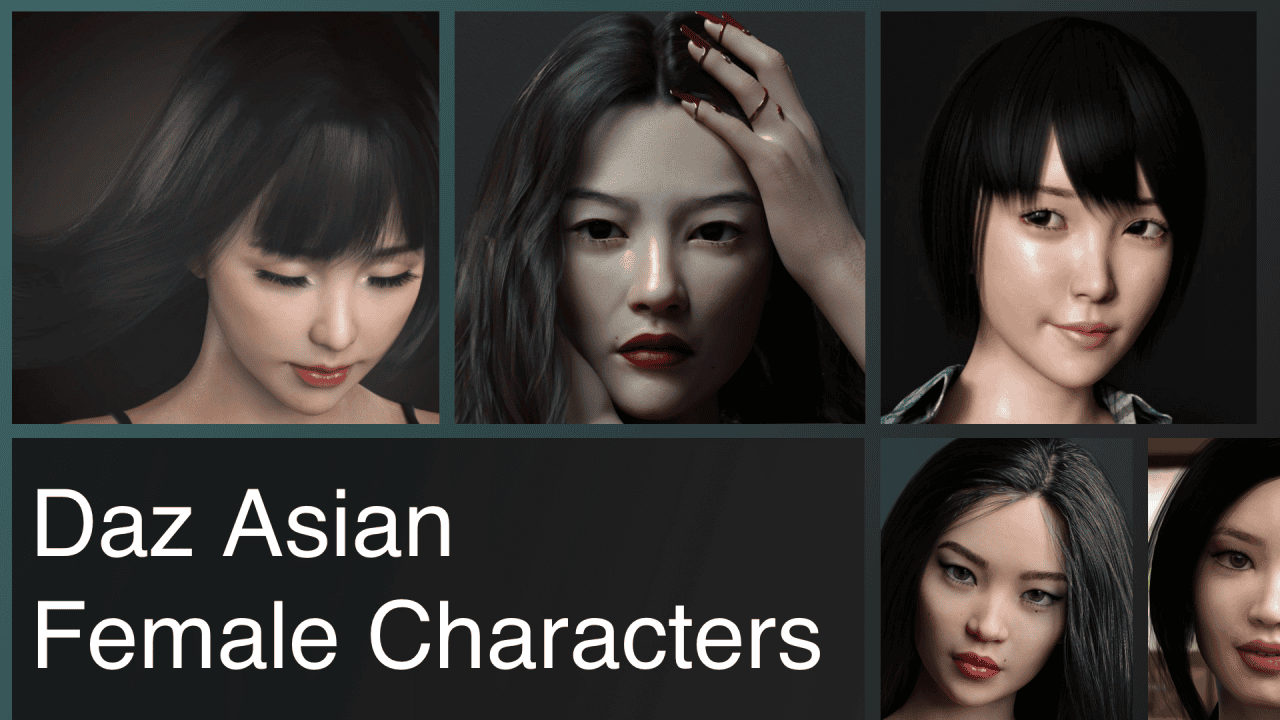
Source Daz3D Asian Female Characters
Conclusion – Daz to Blender Bridge
Daz to Blender Bridge is a huge step in the right direction. Because it allows users to combine different software and use whatever they like. Also, this opens the Daz Studios library of high-quality characters to the Blender community to use easily.
The Daz to Blender Bridge turned out to be the best option to transfer any assets from Daz Studio into Blender. It works on everything – environments, poses, clothes, and even animations. Transfer everything with just a few clicks. After that, you can use Cycles, which is a very good rendering engine with a lot of pros and which is faster than Iray.