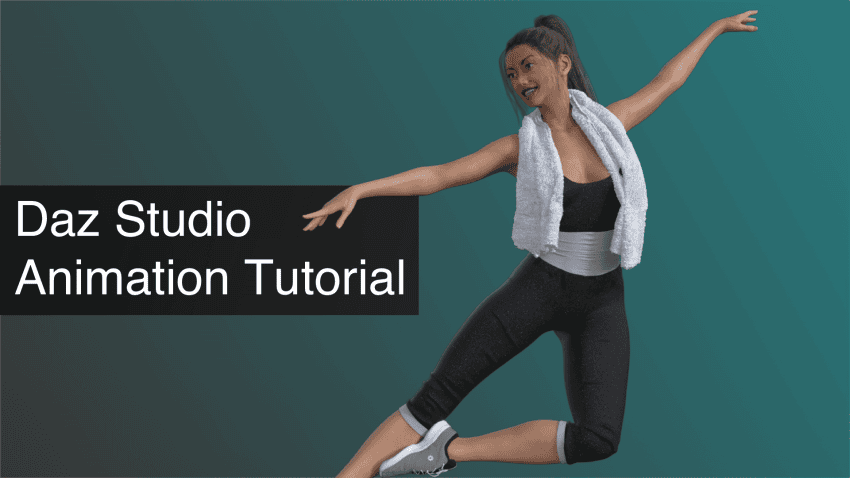
This article is a dedicated daz studio animation tutorial that covers everything connected to animations. Daz3d Animation possibilities are quite good and diverse. So we are going to inform you about all the main aspects of the animation. Such as Interface and main tools and different ways animate avatars/objects and more.
The goal is to allow a total newbie to animate in Daz Studio. We will teach you everything you need to know to start animating and improving on it.
If you prefer to watch parts of it as a video, see the below Daz Studio Animation Tutorial Video, otherwise keep reading.
Interface
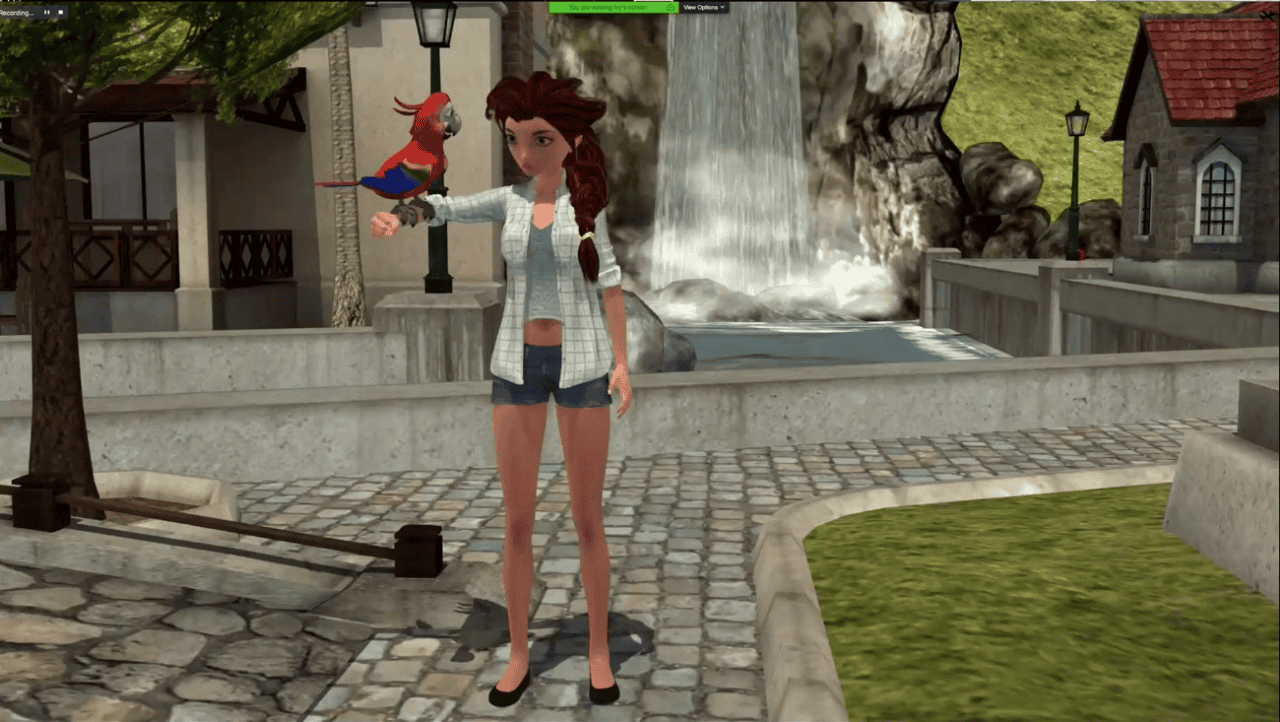
When you open Daz Studio you should be greeted with something similar to the screenshot below.
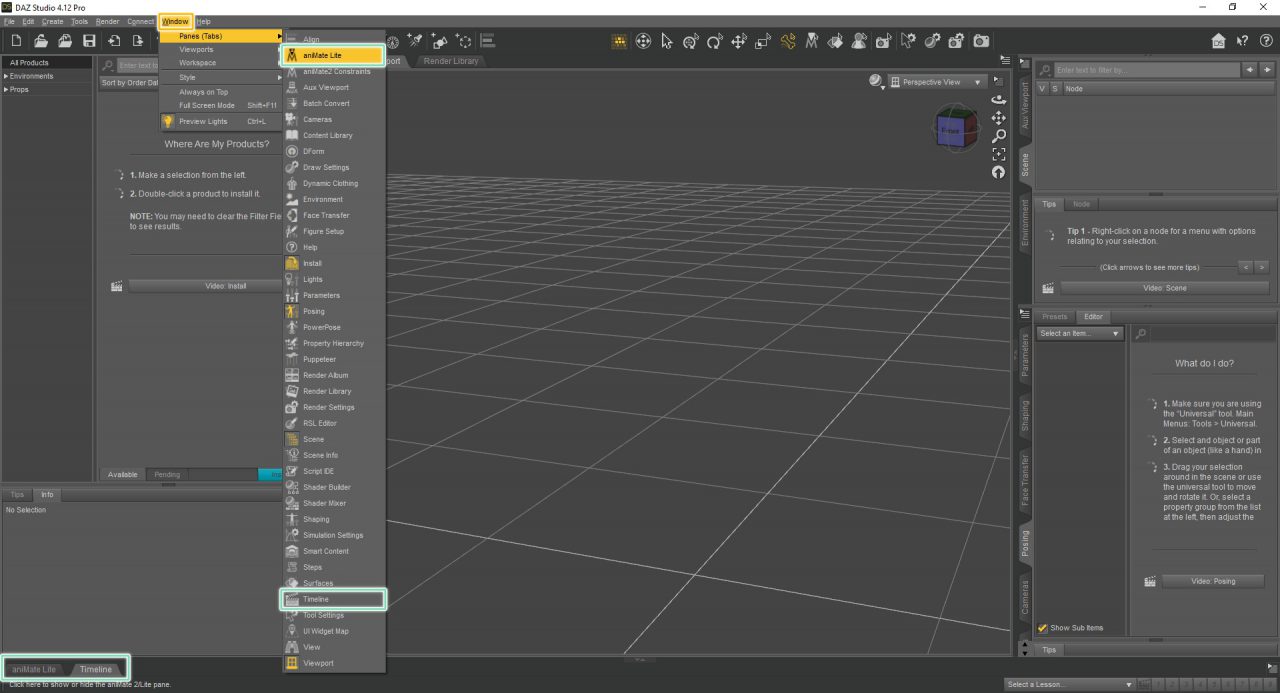
By default you should have both tabs for the Timeline and an aniMate available at the bottom left of the screen. Just press on any of them and they would open.
If you don’t have these tabs there, don’t worry. You can easily find them, same as any other windows, in the “Window > Panes” option.
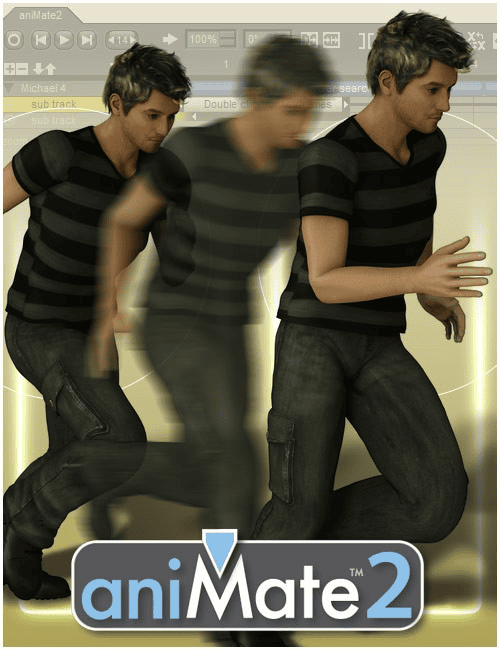
The default “Timeline” in Daz Studio is to say frankly, not the best. The AniMate2, on the other hand, is a much better tool in all ways. But by default you only have the Lite version of AniMate and need to buy the full version to use it. If you have the full version, then the Timeline tool would become obsolete. If you don’t, then the best way is to use both AniMate Lite and Timeline.
Easy Daz Studio Animation using Presets
Firstly, let’s look at the AniMate Lite. As it is arguably easier to understand and work with than Timeline. After you add any figure to your scene, you will see something like this:
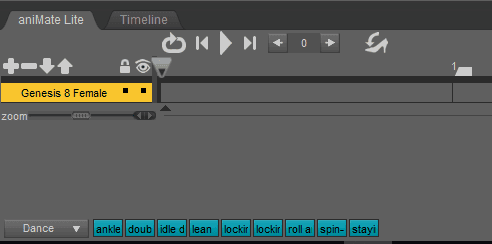
At the top you have all the time controls. You can start daz Studio animation, go to the start or end of the animation, loop it or select the specific frame that you want. Right above our character is a menu for controlling layers, but we don’t have access to that in the Lite version. And at the bottom we have animation presets that we can choose from.
Let’s pay more attention to the last thing we mentioned, animation presets at the bottom. If you mouse over available animations you can see how your character is executing them in real time.
Choose any Daz3d animation that you like. Now click on it and drag it to the timeline above. So you would end up with this:
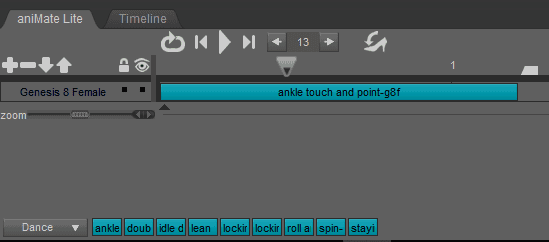
Congratulations, now your character is animated. These cyan blocks are called aniblocks. You can press the play button and look how the figure moves. But it is just a one preset, not a full animation. Let’s make something more interesting.
We will now combine a couple of presets. AniMate tool is really great in combining animations. Let’s make our character walk. If you click on the button on the bottom left of the AniMate interface, you will see a dropdown menu:
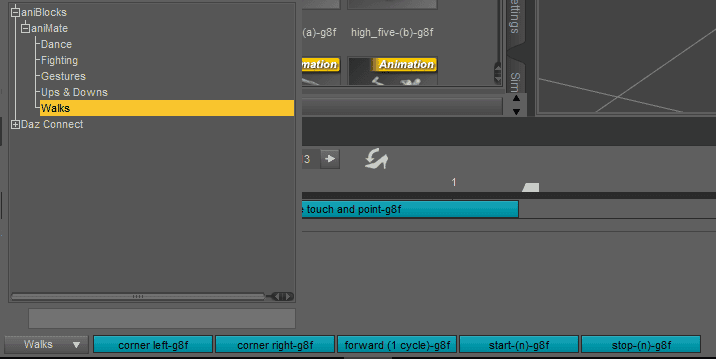
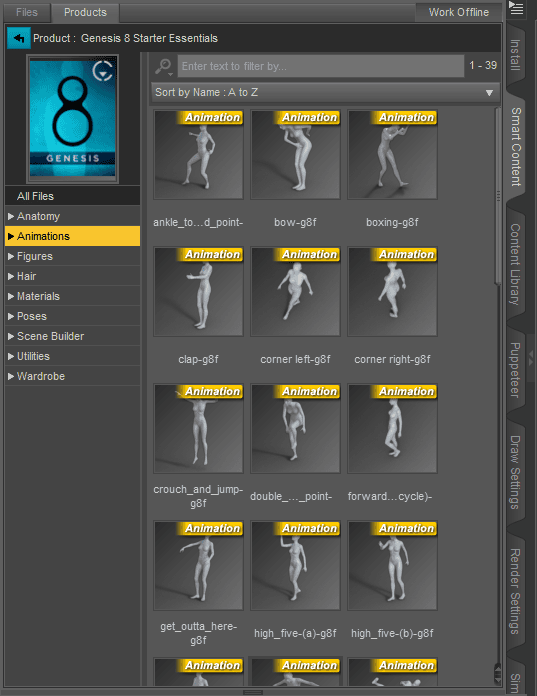
In this menu you have all of the available animations that you can use. We are interested in the “Walks” category. You can also find these presets in your “Smart Content” menu, in the “Animation” section. They work absolutely the same
Now let’s try to combine the animations. Find and drag into the timeline the “start-(n)-g8f”, “forward_(1_cycle)-g8f” and “stop-(n)-g8f”. Put them close together, you should end up with this:

Don’t forget to right click on the white quadrangle just above your aniblocks and select “Auto Adjust”. If you don’t do this, the length of your Daz3d animation will not be adjusted.
After doing this, you can press and watch your character perform all three animations one after another seamless. And you can experiment with this to make something more difficult, use turns or other animations.

The default amount of the animation presets are quite low and not really diverse. But you can buy more on the daz3d store. Mainly pay attention to the Animation Megapacks and Posermocap user, that has over 30 animation packs on different themes – but double check if your preferred genesis generation is supported.
Creating Figure Animation Manually
The following will teach you how to animate a daz figure manually.
Timeline interface
We already showed you preset animations and how to find and use them. But these are pre-determined and what if there are no animations for your situation? Well, as we mentioned, you can try to find needed animation in the shop. Or, you can create your daz studio animation yourself. We will explain how.
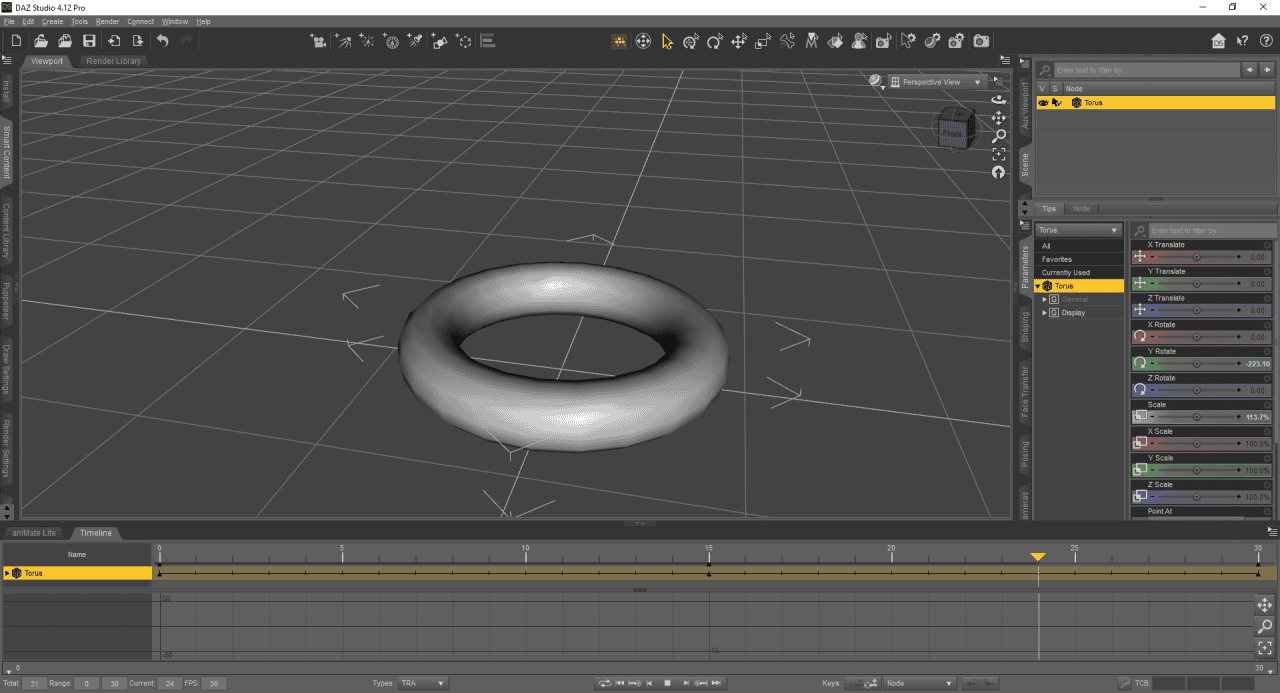
We will work with the Timeline tool this time, so let’s get to know it better. For now we will not change any settings, but you will need it in the future. Here is main interface of the Timeline:
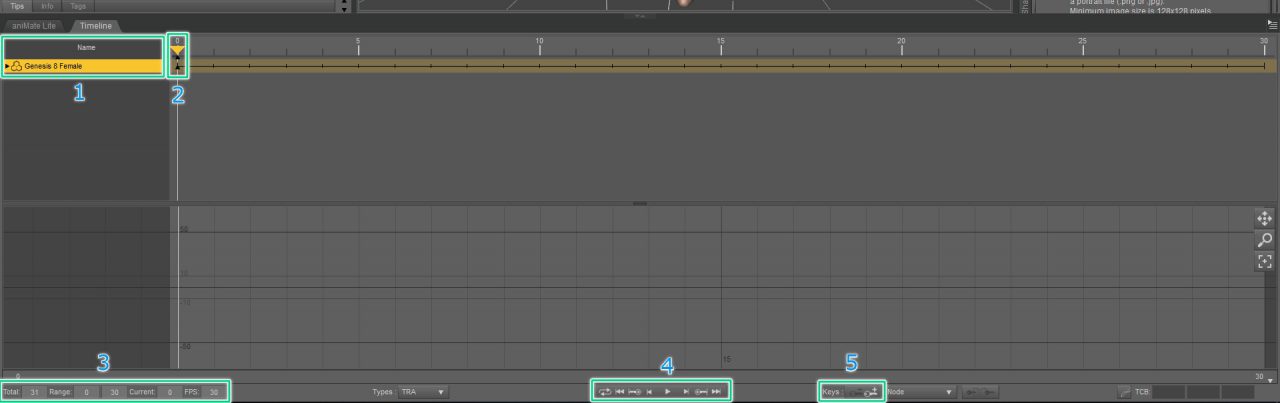
On the left you can see all your available characters that you can animate[1]. A bit to the is the timeline itself, you can see all the frames there and keyframes. On the timeline [2] there is a yellow triangle that shows what frames it is on the scene now and black triangles are the keyframes.
Bottom left is for everything about frames. You can see and change how many frames in the animation, their range, current frame and frames per second [3]. At the center controls for playing animation. You can play animation, jump to keyframes, go to the end and start or loop animation [4]. And to the right is the controls for keyframes. You can add and delete keyframes with these buttons [5].
Animation from Poses
Now we can create something. Firstly you need to add a character. Then choose any pose from the “Poses” section in the smart content. This will automatically create a keyframe.
Then change your current frame to somewhere later. The last frame would be good. You can do this by dragging the yellow triangle along the timeline, or by typing the number in the “Current” setting at the bottom.
After doing that, just choose any other pose from the selection. Preferably something similar to the first one. This will create a keyframe at the current frame. You will end up with something like this:

And now you can just press play and see how your character changes from one pose to another in smooth animation.
Now you can just experiment with this. For example double the total frame amount and add first pose again as the last keyframe. Your character will move from first pose to the second and then back to first. This will create a nice loop. Or add more different poses and test how they look.
Animating by Transforming Character
As you now understand, adding poses – creates keyframes. But in reality, absolutely any transformation creates keyframes. So let’s create some unique animation that can’t be created with poses or presets.
If you don’t have ideas, the first good animation would be the character waving their hand. Place your character as you want it for the first frame. Then change the frame to later and thansform figure, so it will be different from the first frame. Thus, creating animation. Easy. Let’s look at the ways how you can do this
First, and probably easiest to understand is the ActivePose tool. You can find it among other tools at the top of the interface

After selecting the tool, just click and drag any part of your character that you want to transform. It is easy to do and understand how it works. It moves the bone and each connected part, making animation look realistic. The problem with this way is that it is not very precise and sometimes it can be hard to do exactly what you have planned.
Next way to transform a character would be the Rotating tool at the top right, when you have part of the figure selected.
So you select any part that you want to daz3d animate. And now can rotate only this part by moving sliders. This will twist this part, move it from side to side or bend it. Also you can make all three transforms at the same time if you click and drag the sphere in the middle of the tool.
Powerpose tool is a very strong and useful instrument. You can open if you follow “Window>Panes(Tabs)>Powerpose”. Interface looks like this:
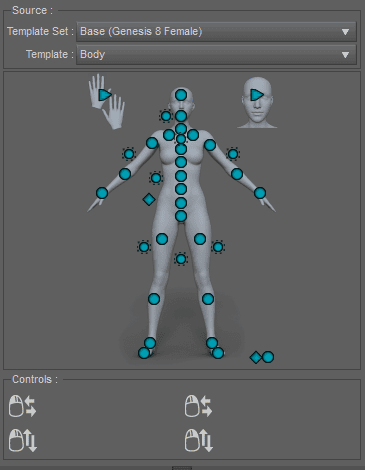
Here you can click on the circles and move the mouse to transform the corresponding parts of the character. Also you can change between body, hands and head templates. Daz3d Genesis 8 figures have their own, improved template sets that also include face template. We already wrote more about PowerPose for Genesis 8 figures in our other article.
Last method of transforming that we are mentioning is the “Pose Controls” menu. You can find it under the “Parameters” when your character is selected.
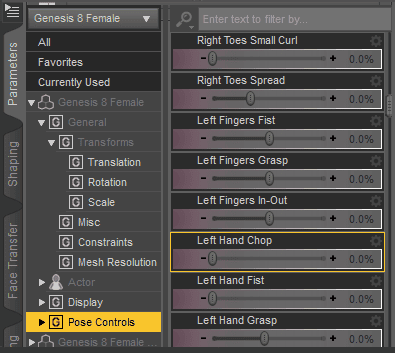
Using it is very easy. Just find what you want to change in your character and move the slider. For example, you can find sliders for making fists or bending the hip.
Now you know all the main ways of transforming your character. There are more ways, such as morphing or scaling, but they are not really needed in animation. So with this knowledge you can try to create something yourself. Just change the current frame, make some changes and do this a couple of times.
Remember, that you don’t need to stick with one of the options to daz 3d animate your character. The best way is to combine them all. Choose a pose that is close to something that you need. Place everything roughly where you need it with the ActivePose tool or PowerPose. And finally make all of the small details with the Pose Controls and Rotation tool. Rinse and repeat a couple of times and you have an animation.
Export and Import your Daz Studio Animation
After you are done with the animation, you can export it into another program. Or export your character without animation so you can animate it somewhere else and then bring back here.
Exporting is easy. Just go to the top menu, click “File” and find there “Export”

After that, simply choose the place on your computer where you want to save this file. And, most importantly, the format.

For daz animations we recommend exporting either the BioVision .bvh format (also known as motion capture) or the Autodesk .fbx format. First one will import animations of your character. On the other hand, the second one also exports all information as the clothes of the character and place.
Right above the export you can find the Import option. You need just to find the needed file on your computer and open it. Importing the .bvh files will import only the animation and apply it to your character.
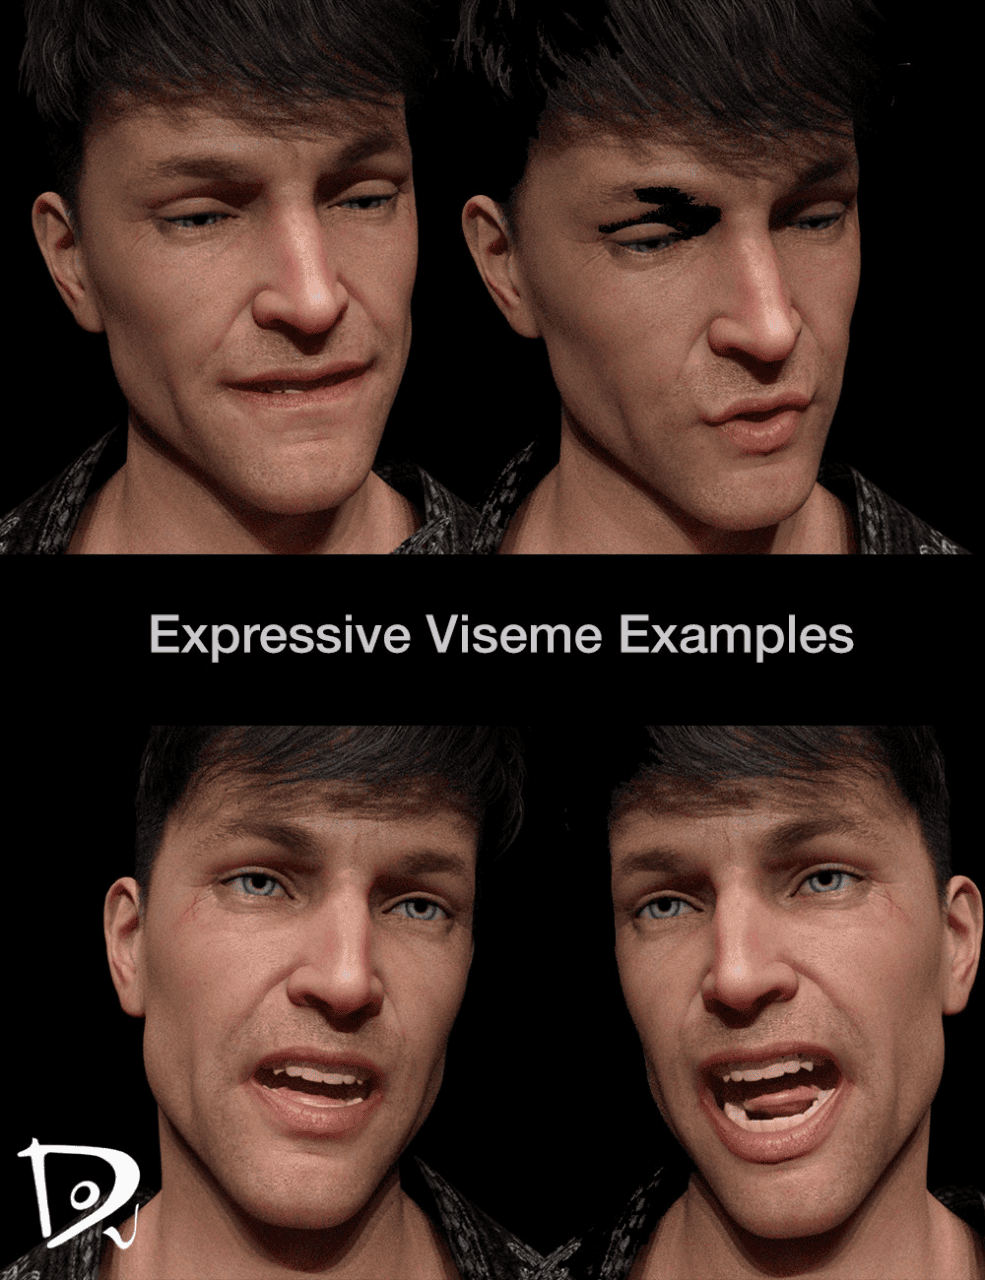
Face Daz Animation
Animating faces was always not an easy task in the Daz Studio. Mainly because there are no preset daz3d animations for the faces, as there is for the body. Meaning you need to create them yourself.
Basically everything that was already said about animating bodies, applies for animating faces too. Use the ActivePose and Rotation tools. But pay close attention to the Powerpose and Pose Controls. Because they are especially useful in creating face animations.
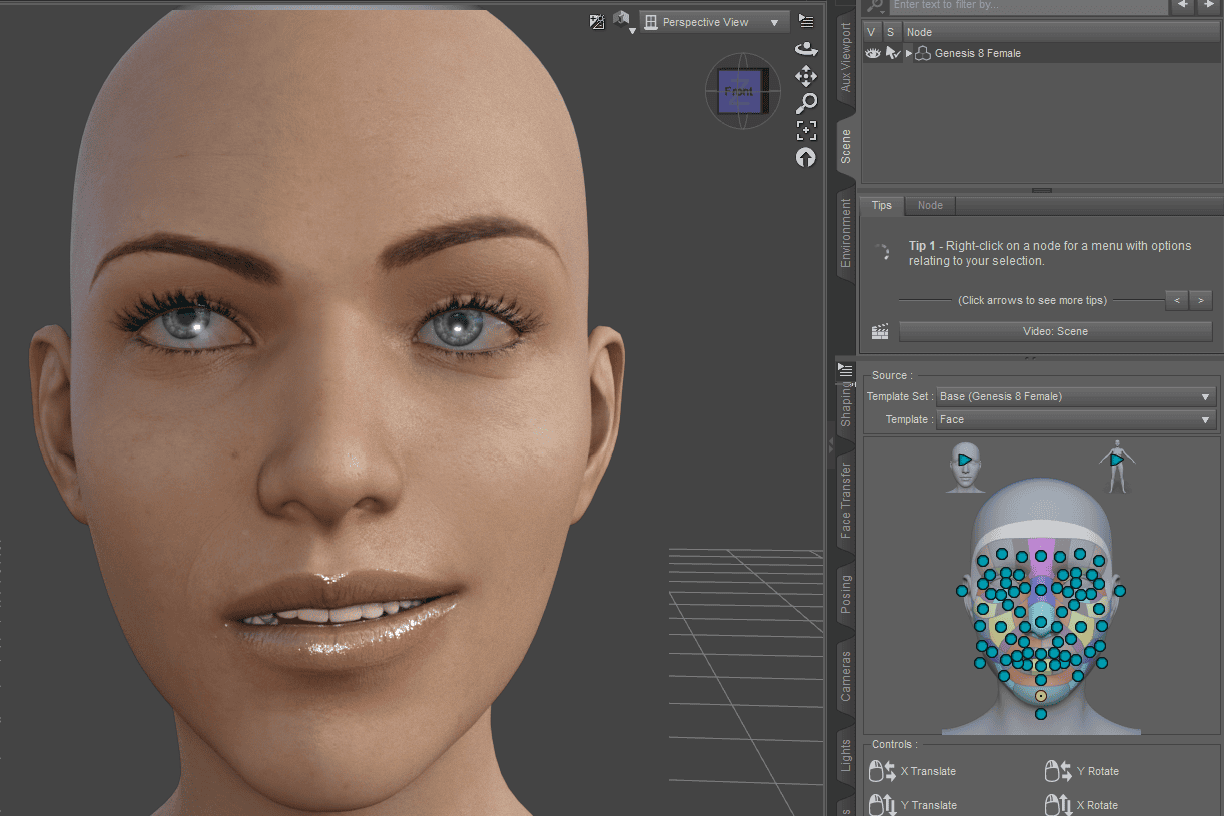
Powerpose has more interactions with the Genesis 8 figures and it is easy to create some expressions and then to add them as keyframes. Also it has the “Face” template for advanced transforms. Example expression created in the PowerPose:
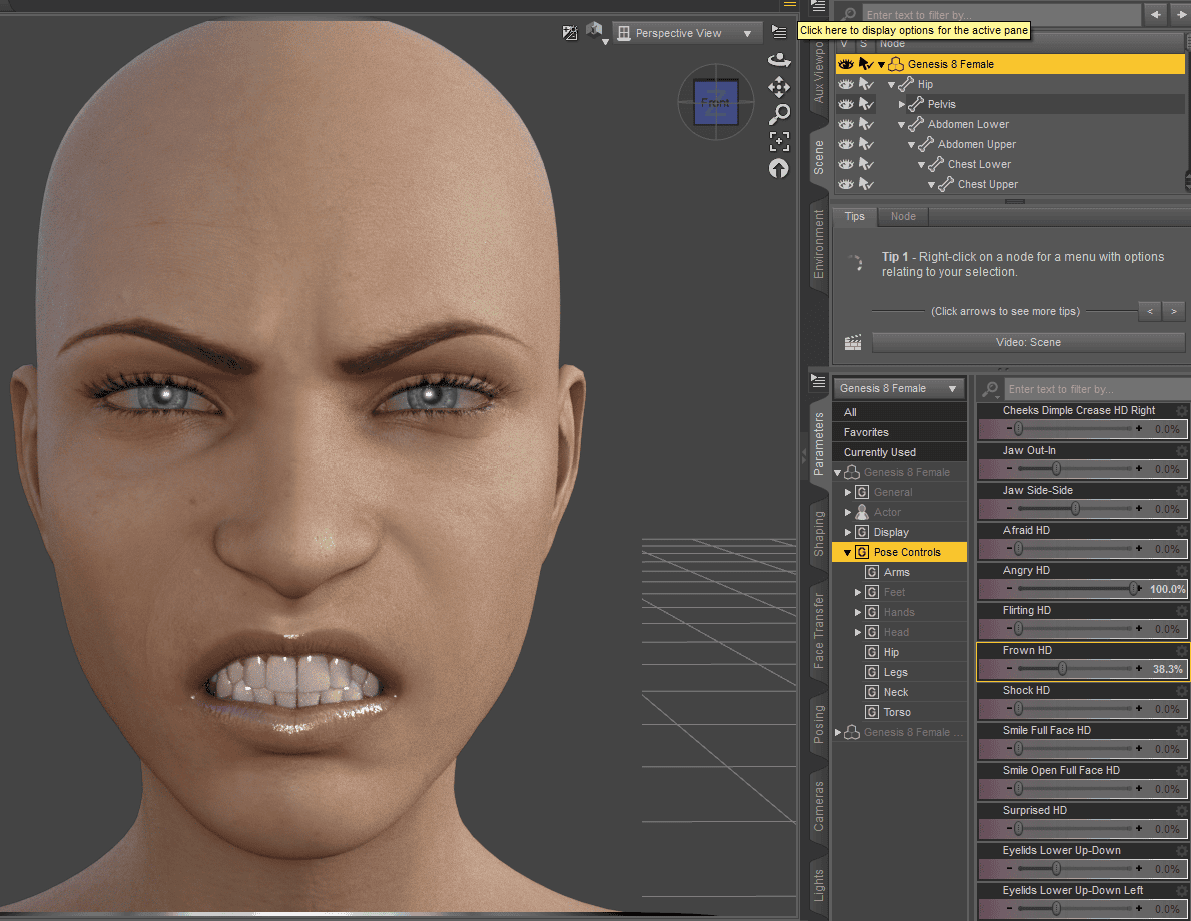
As was said previously, you can find a lot of options in the “Pose Controls”. Good to know, that there are a lot of transforms for faces. Some are even close to morphs. Meaning you can make your character look angry just by moving couple sliders:
But to be honest, these tools are really hard to use if you want to create some unique and detailed face daz animation. That is to say, that for more comfortable face animating there are two options.
First is difficult. You can use other software that was created for animating, thus having some better tools. This is programs such as iClone and others. But this method needs knowledge of other software. We already said how you can export your characters to use them in other software and how to import them back again.
Another method is animating in Daz Studio. But with the use of some add-ons. A good example would be the Anilip 2 product. It animates your character speaking for you. Making it look realistic and good. And you can write the text yourself with a text-to-speech function, record it with Speech Recognition or upload using cloud services.
Different speaking expressions – source Anilip 2
dForce Animation Clothes/Cloths/…
All the clothes and hair of your characters stay static during animation. Even if your scene is supposed to have them moving. You can move them manually, by transforming the part that is supposed to move each frame.
Or a much better way – use the dForce tool that is built-in the Daz Studio. It makes your objects obey the laws of physics that you can control. So the hair can jump, clothes flutter in the wind and so on. Example of a simulated cloth with the dForce:
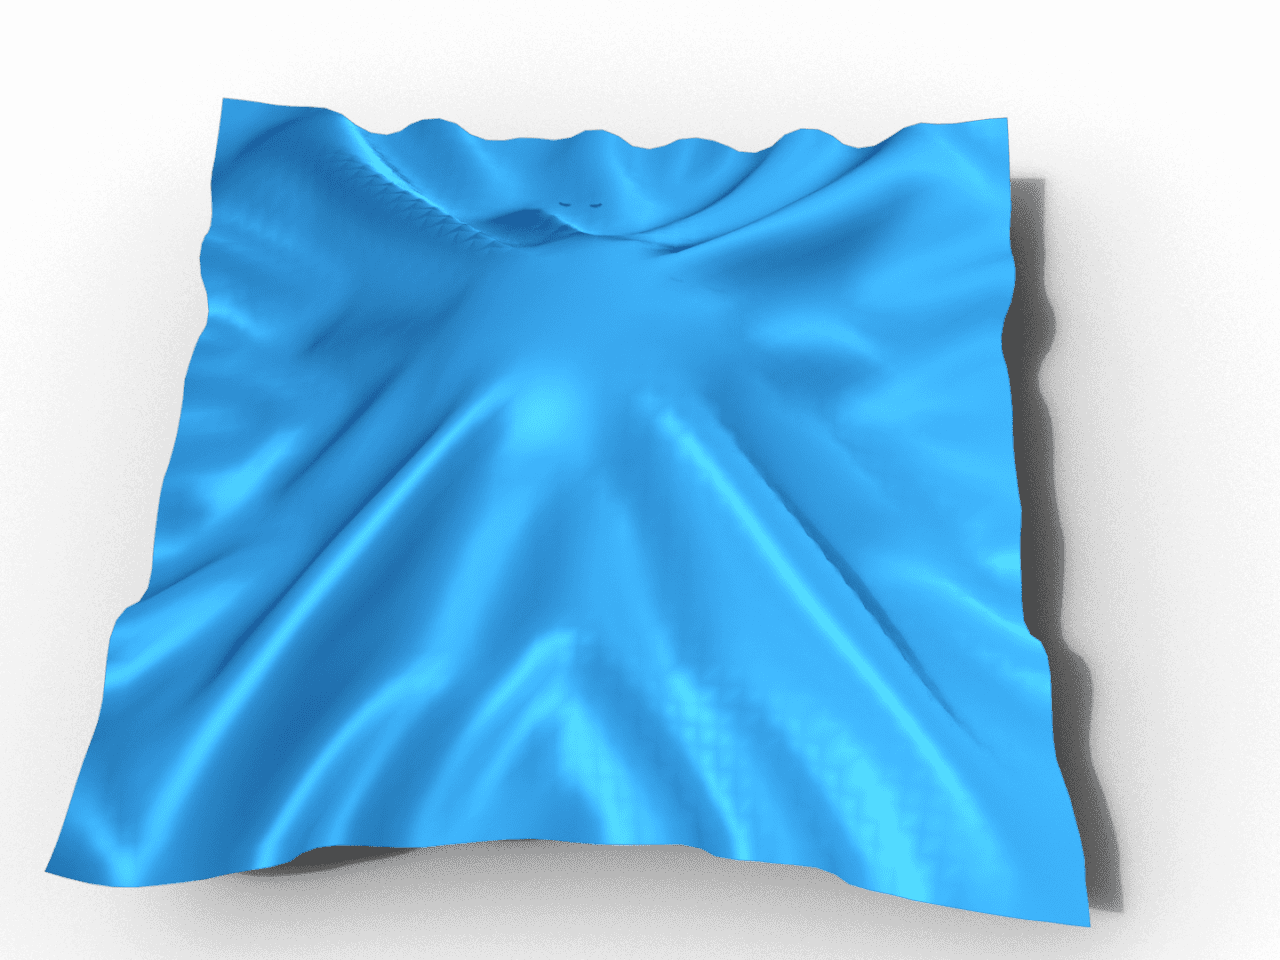
When working with the dForce just change the option “Frames to Simulate” to “Animated” and this will play the simulation based on the timeline. So you can transform your subject and during the daz animation, dForce would simulate physics for each frame. You can read about this useful function and how to use it in our article about dForce in Daz Studio.
Daz Studio Animation Tools
We already talked about some tools that you can use to create daz 3d animations. But it is not all, there are a bunch more to that. Learn about other useful tools in this section
First would be the “Puppeteer”. This tool is interesting, because it is free and built-in to Daz Studio by default. Also it is an ambiguous thing, as some can find it useless, while others would love it. Open it as any other tool in the “Windows” menu.
To use “Puppeteer” add a character and transform them in some way. Best example would be adding face expressions. And now just click inside the “Puppeteer” interface. This will create a dot:

After that, just as with any other animation, do some transforms again. That is to say, that character needs to be different from the previous state. And create another dot in “Puppeteer” by clicking there. Preferably, second dot should be on the same axis as the first, like this:
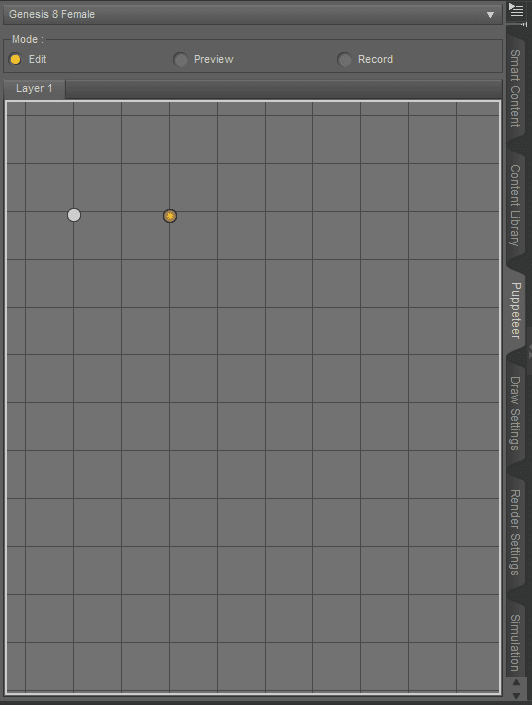
Now if you change the mode from Edit to Preview, you can drag somewhere in the interface and see how your character animates. The closer you are to one of the dots, the closer your character to that transform. And faster you move – faster the Daz Studio animation goes.
To create animation, change mode again, this time to Record. It works the same as Preview, the difference is that Daz Studio will record your actions in real time and remember them. So when you end and press play on the timeline, it will repeat everything in the same way you did it.
Other tools that we would mention are not built-in to the Daz Studio and can be found in the Daz3d Shop among other useful products.
Probably the best tool for creating animations is the AniMate2. We already mentioned it and worked in the Lite version of the add-on. It just adds a very useful alternative to the default “Timeline”. It has a lot more functions and much easier to work with.
We already mentioned Anilip2 when we wrote about face animation. But it is worth mentioning it again here, as it is a really useful tool and a best way of creating talking animations.
Creating an Object Animation Manually
We talked about how you can animate characters. But what about other things? For example some objects, like chairs, tables or doors. Well, if you know how to animate characters, it would not be a problem to animate anything else.
Animating objects have nothing unusual going on for them. Just use all the techniques that we already discussed. Transform them at one frame, then change to another and transform them there.
There are no unique tips or tricks for objects animation that we are aware of. Just a good idea to use dForce on any object that could benefit from it. We talked about dForce in a separate article in detail.
Daz Camera Animation
If you have a long animation scene, it probably would be a good idea to animate your camera. Having a stationary camera, while everything in your scene moves will not look good.
You can make fly-throughs through your scene or make your camera transition between views. Cameras can follow your characters and characters can follow cameras too. All of this is what we are going to talk about in this section.
Camera Following a Character
Sometimes you want your character to move. And obviously because of that, they can go out of the camera view or move out of focus. Of course this means that you want cameras to follow character movements. It can be done manually, by rotating the camera and adding keyframes.
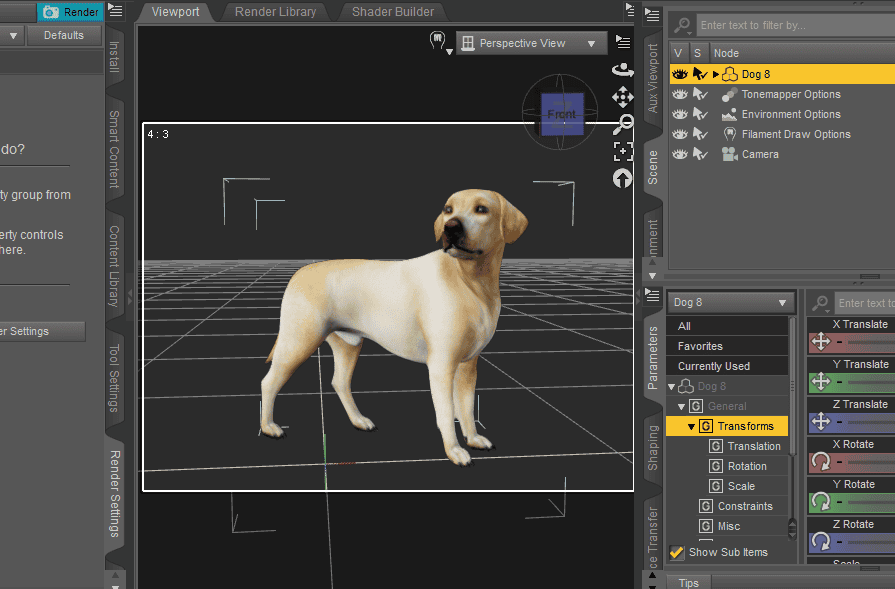
Alternatively, this can be easily automated. If you create a camera and go into its parameters, you can find there the “Constraints” option:
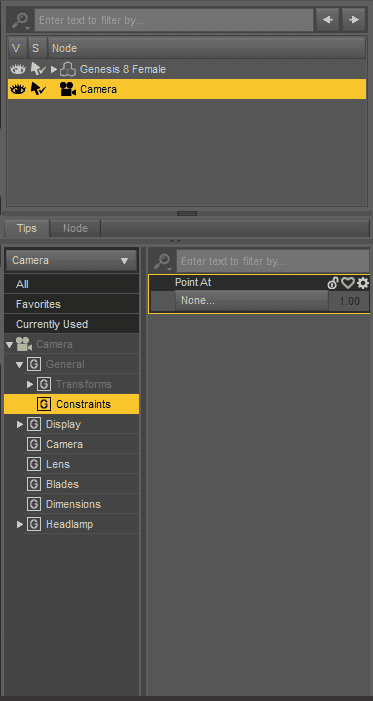
And here, in “Point at”, you can choose what to follow. You will need to choose some part of the body, for example, the head. Because if you select the character, the camera will be pointed at its bottom, because that is where character origin point is.

Now we can move both the camera and character however we like. And the camera will always be pointing at the head of our character.
Fly-throughs Camera Animation
Another important camera movement that will improve your scene. You can make the fly-throughs pretty easy, it is more a case of understanding best ways to do them.
To make a fly-through, just use all of the methods we talked about in this daz studio animation tutorial. Use transforms, create keyframes. One thing that is different, is that you can change to camera view and control it like it’s a viewport. It will also create keyframes, as regular. So combine these two techniques and create needed animations. Position the camera at your first frame, then select your end frame and position the camera at that point of time.
Animating camera using different transforms
Making Figures Look at the Camera
There are situations when you want your characters to look directly into the camera. And that is not too hard to realize. Just use different transforms to point your head and eyes at the camera.
But if you work with animation, where every frame the position of camera and characters can change, it quickly can become too much work. That is why Daz3D added the “Constraints” option in the Parameters. The same option we used for the Camera to follow character. Yes, it can work both ways.
So you need to click on the eye, open the “Point at” menu and choose “Camera” there. Or any other object in that case. You can see the eyes looking at the camera with this technique on the screenshot:
Sadly, this will not work on the head. As using constraint to point the head at the camera, will point top of the head, instead of the face. So you need to move the character’s head manually for this. Or are you?
Fortunately, some good people made a script that will, indeed, point both the head and the eyes at the camera. You can download this script by following the link: https://sites.google.com/site/mcasualsdazscripts2/mcjlookatthecamera
Also, there is one more useful script available. By default, when you point the eyes at the camera – it will affect only the eyeballs. Meaning, that other parts of the eye, such as eyelashes will not move. Exactly this improves the PointAt-Fixer script.
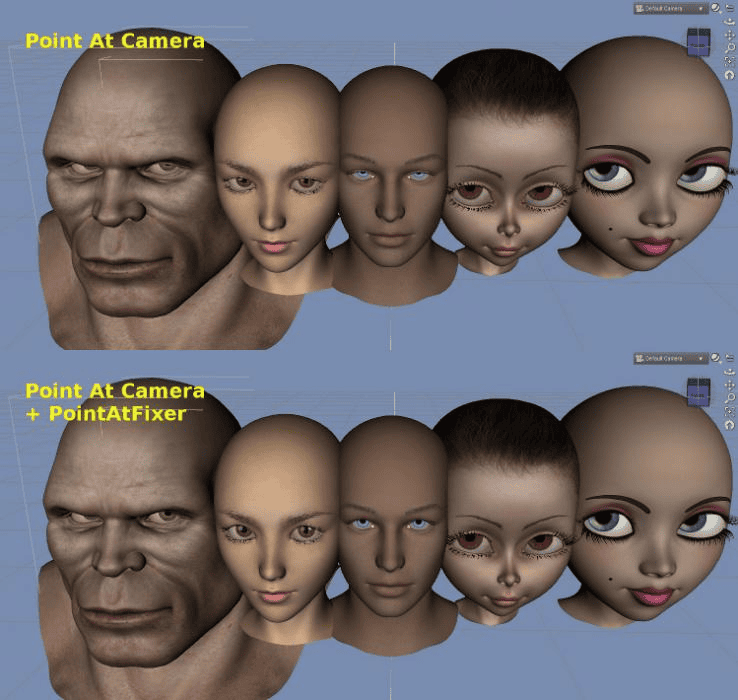
Comparison how it looks without and with the script – PointAt-Fixer.
Camera Transitions
If you want to make some cinematic daz studio animation and have more then one camera, you probably would want to have some transitions between them. There are a couple of ways to achieve this effect.
First, and probably not the best, though worth talking about. That is to place a couple of cameras and then render the whole Daz 3d animation from the view of each individual camera. After this, you can use some other video editing software, to combine the renders and make it how you want it.
Main disadvantage of this method is that you will need to render your scene once for each camera. And this can be a really long process.
Scene with two cameras
Other method is more difficult to set up, but does not require rendering for more than one time. This method is based on using only one camera and just animating it in the way that looks like there are more than one.
For this, you will need to create a keyframe of the camera placed from the one view that you want. And on exactly the next frame you need to have another keyframe with the camera placed at the different place. Because this animation is taking only one frame, then the camera will teleport from one place to another. And during animation that will make it feel as if the view was changed from one camera to another. Here is how it look on the timeline:

First keyframe is the camera in the first position, second keyframe placed on the next frame and here the camera moved to another place. Third keyframe is the same as the second one, just placed later. And keyframe four is the camera moved at the other, third position.
This setup will provide animation that looks like view transitioning between cameras. First we have one view, then look from another “camera” for 10 frames and change to a third view.
Also there is a third way of making these transitions. You can download the script that allows you to transition between cameras on the fly right while you render. So you can render one daz animation from different camera views while rendering only one time.
Rotation Daz3d Animation
There are definitely some situations when you want to make a rotation animation. Most commonly for cameras, because users want to film their character around. Or sometimes you want to show your model from all possible angles.
You can always create rotation daz animations yourself. As usually, transform your subjects, rotate them manually and add keyframes for each change. Do this in the right way and the result will be as wanted.
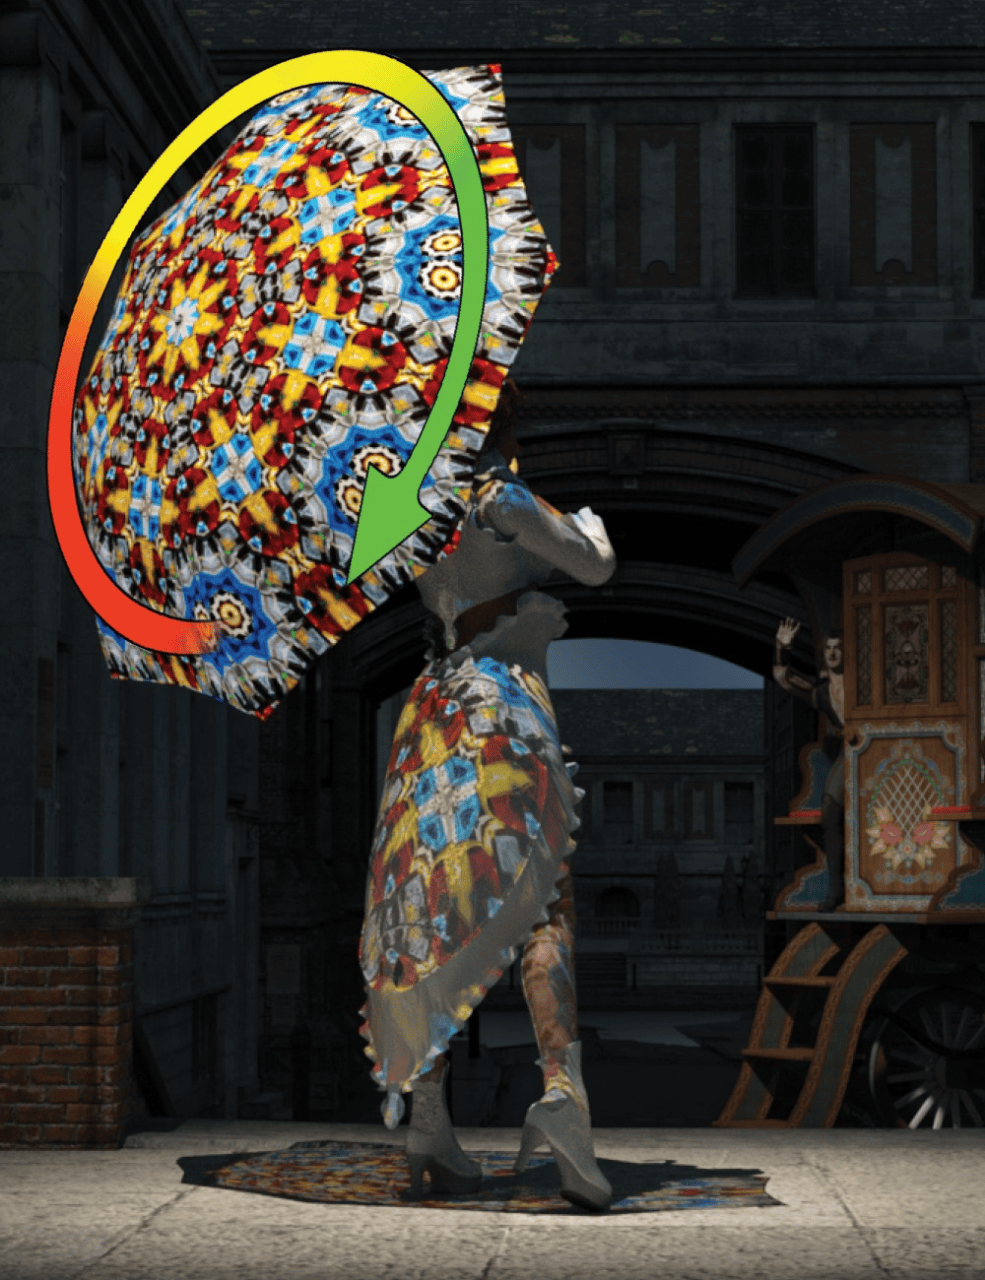
Lady spinning the Umbrella – source 360 Rotating Turntable Animations.
On other hand, you can use a special tool created for this. It is called 360 Rotating Turntable Animations. This tool adds nodes that are rotating in different ways. So you just need to parent anything that you want to this node and it will rotate in this exact way.
Light Animation in Daz Studio
Absolutely the same way as any other object, be it character or camera, you can animate the lights. That is really useful, because you also can animate the properties of the light.
Firstly, you can make light sources move. This is no different from animating cameras. You can use a function that allows you to change to the light view as if it was a camera and move it like that. Or move it as any other object by using parameters tab or Translate tool.
Secondly and more interesting, you can animate properties of the light. This includes almost any property, as color, temperature, strength and even size. Remember to place the keyframe manually before doing changes to properties. Because if you don’t do it, it will just change the properties and not animate. After that, go to the later frame, make needed changes to the properties and place a new keyframe.
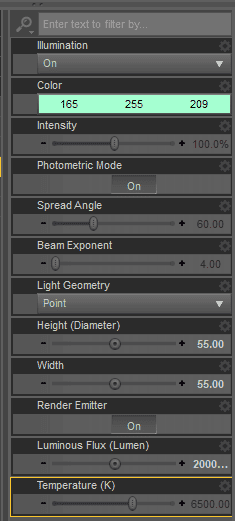
Color, size and lumens properties in the middle of animation.
Texture Animation in Daz
The last thing that you can animate that we are mentioning in the article are textures. At first texture animation sounds strange. Why would someone animate textures? But if you think about it, it can be really useful.
Imagine you have a pool of water in your scene. And while everything around is animated and moving, changing in some way, water just stays static. Sounds boring. That is because usually water is made with textures, and sadly you can’t animate textures in the Daz Studio by default.
Fortunately someone named DraagonStorm has made the Animated Textures Script for DAZ Studio. This great script allows any user to create animated textures.
Animated television screen texture – source Animated Textures Script
With its help you can animate any mappable property of your scene. It also proposes lighting and background properties animation, not only surfaces. What is wonderful, it is easy to use and requires minimal settings.
Daz3d Animation Rendering
We can’t tell about the animations without mentioning rendering. Anybody can wonder how to render quicker animations daz3d? Well Daz3d rendering animations is not that much different from any other form of rendering. But there are still differences that you need to know.
When you render an image, it doesn’t really matter what the aspect ratio is. You can change it depending on the scene and purpose. But with animations it would be a good idea to stick with the 16:9 aspect ratio. Because this is the most common aspect ratio in the media right now. Most of the smartphones and computers stick to it or around it. And if your animation would be different, than on 16:9 screen it will have black bars.

Picture with the black bars as example – source pngimage.net
Next significant thing is resolution. This one is easy. Most frequently people use either HD 1280×720 resolution or FullHD 1920×1080. Obviously higher resolution means better picture, but quite longer renders. So you need to decide for yourself what to choose.
Also you always can experiment both with resolution and aspect ratio. Use black bars in cinematic animations. Try UltraHD resolution, or lower it to 480p for faster Daz3d render animations. Everything is up to you.
Something that you need to always remember, when Daz 3d rendering animations is that to change “Render type” to either Image Series or Movie:
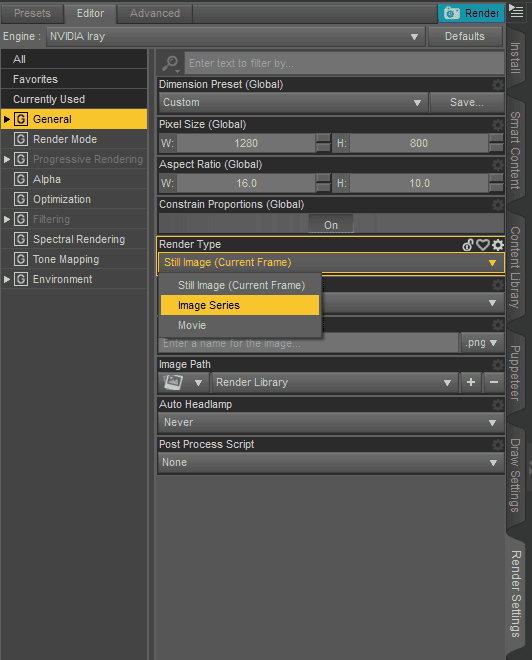
Though we recommend at all situations to use the Image Series. It is just much easier and safer to work with. No advantages to using movies over it.
Then you need to set up the “Progression Rendering” tab. We recommend turning off “Rendering Quality” and using the “max samples” option for this. You need to find the lowest number that you can afford, so your scene will look good. We can’t give you this number, because it depends on your scene and resolution.
About Filtering: there is no reason to turn off the Firefly filter, it is useful and important. Post Denoiser, on other hand, is much more controversial. It can definitely help with the final result, but it has its flaws, especially the time it takes. In short, we would recommend turning it on, but set the “Post Denoiser Start iteration” to number around 80-90% of your Max Samples.
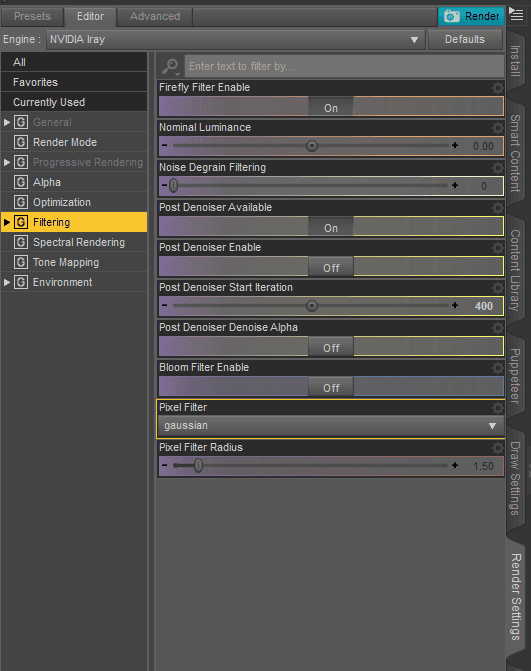
Filtering settings with Max Samples set to 500
That is all of the main differences of rendering animation compared to image. But there are a lot more to rendering overall. That is to say to aspects, that affect all kinds of renderings. To help you with that we have an article dedicated to Render settings in Daz3d Daz Studio.
Filament Rendering
Filament is a new rendering engine that became available in Daz Studio 4.14 for free. Filaments is a fast, real-time rendering engine. Meaning that it renders as fast, as you move around. Learn about it in our Daz3D Filament Tutorial

Mainly this rendering is used to preview your scene, materials, environment. But you can also animate using Filament. The tremendous advantage of using Filament this way is that it renders so fast. So instead of rendering your animations for countless hours – you can do that in mere minutes.
Filament does look worse that Iray and that is obvious. But animations are about fast movement and constant change. So the overall quality would not be as noticeable in animations, compared to the still image. If you wish to try animating in Filament, we have a Daz3D Filament Animation Tutorial to help you with that.
From Daz3D Filament Animation Tutorial
Paid Tutorials about Daz Studio Animation
If you are serious about making animations in Daz Studio, then you probably will need some more help, then our article. This is a good start, but it’s only a start. There is much more to animations and all of its tricks and uses.
Doing all of the learning and research all by yourself can be really difficult. But don’t worry, there are some really good tutorials that will help you. Some examples from the Daz3d Shop:
- First one is Daz Studio : Getting Started with Animation. Ands as can be apparent from the name, it will help you start animating. This tutorial provides all of the needed information about how to use aniMate2, Puppeteer and other tools that you will need.
Scene from the tutorial – source Getting Started with Animation
- Second tutorial that we can recommend is called Daz Studio Iray Animation Tricks. It is for people, who already know the basics and want to improve on their skills. Here you can learn about tips, that will make your animations better and render speeds faster
- Last, but not least is Motion Graphics : Easy Animation for Visual Storytelling. This tutorial is fully dedicated to motion graphics and how to use them
Daz Studio Animation – Conclusion
In this daz studio animation tutorial we tried to provide information about all aspects of 3d animations in daz. We told you everything, that you need to know to start animating yourself. Introduced you to the interface and main methods of animation. Told about main tools, animating with dForce and face animation. Showed the ways to animate any object, be it camera, light or table.
We understand that this tutorial is not enough to make you an expert in animation. And only practice will make you one. But the goal is to help you start and introduce everything. Hope we managed that.
Also have a look at our other articles for example the Daz3d Iray Lightning Tutorial or any of our product reviews e.g. the Top Bar 3d Models or Top Swimming Pool 3d Models.