This Blender 3D Printing Tutorial explains how to prepare your Blender models for 3d printing and how to fix appearing issues during that process.
3D Printing is modern technology that keeps on growing and becoming more popular each day. Blender is a free 3D modeling tool that allows creating objects for printing and to transform existing meshes. So it is a very fitting tool for 3D printing, that is why we will explain how you can handle this using Blender.
Blender 3D Printing Preparations
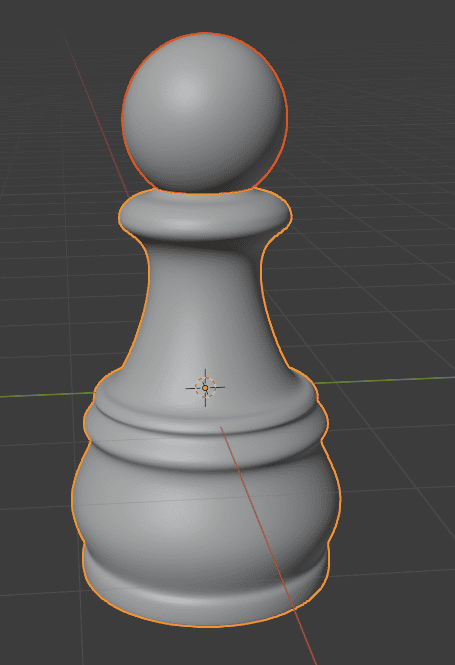
I am going to be using this chess pawn model that I made. It consists of two objects: the top and the bottom of the pawn.
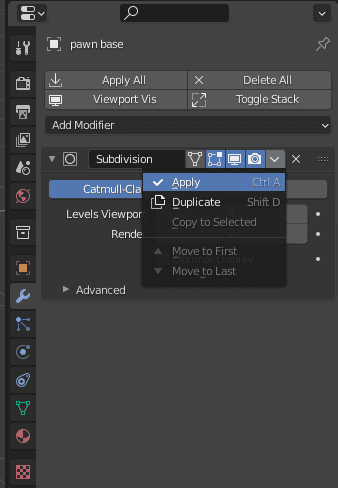
Let’s prepare this object for printing and make all necessary changes to it. Firstly – modifiers. There should be no modifiers applied to an object. When exporting, they should apply automatically, but I would recommend you to apply them beforehand, so it would be easier to work with the mesh.
Both my objects have a Subdivision Surface modifier on them, so I just need to apply it.
After this, it would be a good idea to look at the polycount. You can see the exact numbers if you turn on the statics setting in the overlays.
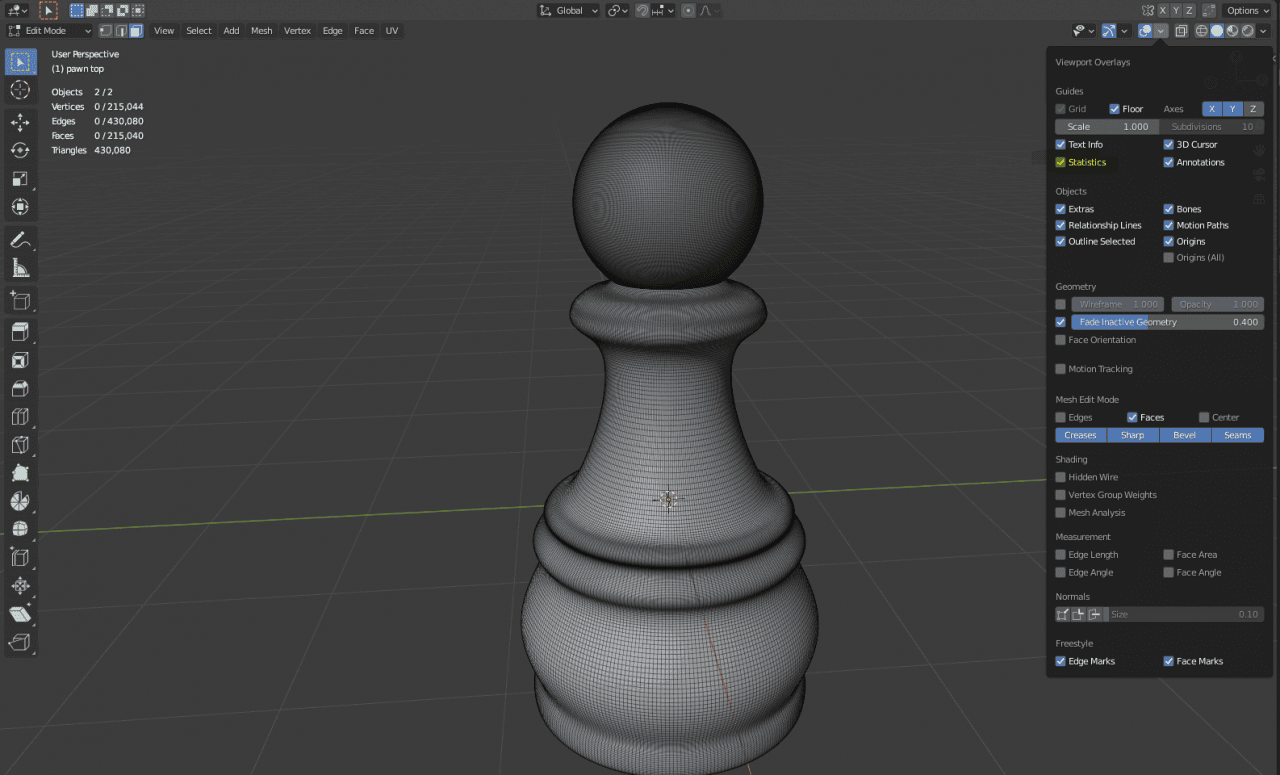
You can see that I have quite a lot of polygons. Both in numbers and on the mesh itself – a lot of faces can be seen. Generally, there is no need for so many. Simply because in the end, an object would be very small and such small details basically can’t be produced on the 3D printer anyway. So I would lower the polycount.
Yes, I could have just decreased the Subdivision Surface Modifier, but you can be in a situation when this is not possible, so what should you do? I will recommend you to use the Decimate modifier.

Using it, you can easily lower the polycount without changing the shape of an object too much. For example, I have managed to lower the number of faces 20 times and the object still looks almost the same. It would not make any difference on the printed result too.
Next – you need to connect everything. There should only be a single object on the scene and nothing more. In my case, there are clearly two – so this needs fixing.
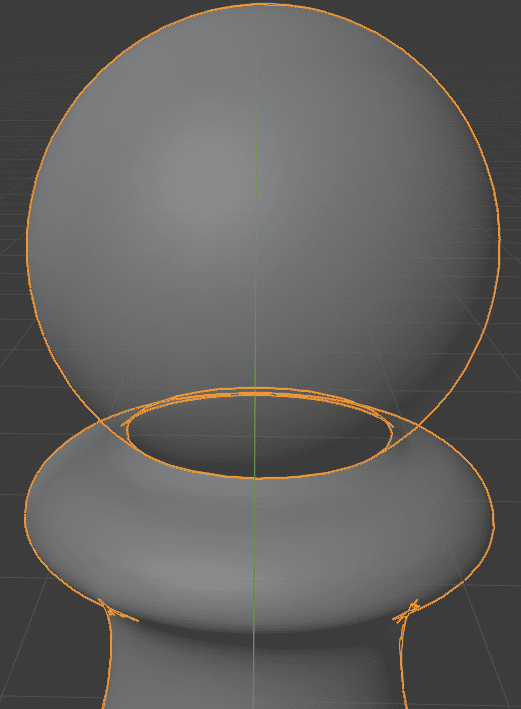
A simple solution would be to just join these two objects and that is it. But this won’t work, because with the X-ray we can see that the top and bottom of an object overlap – the sphere is inside the base.

This is bad and you should at all costs avoid situations like this. Your printer will try to print it like this and it would not be good. So what should you do instead is use the Boolean modifier on the Union setting.
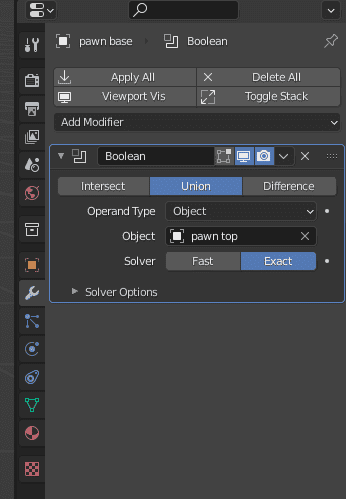
It will automatically connect two objects into one and delete all of the overlapping faces. So it should create a single object without any overlapping. On the screenshot, we can see that the sphere does not have faces inside the base anymore.
3D Printing Add-on – Your Best Friend
A very important thing that you need to know before proceeding any further is the 3D Printing add-on. It is an immensely useful tool that will help us in preparing an object for 3D Printing.
To activate this add-on, all you need to do is to find it in the Add-ons section of the Preferences menu and turn it on.
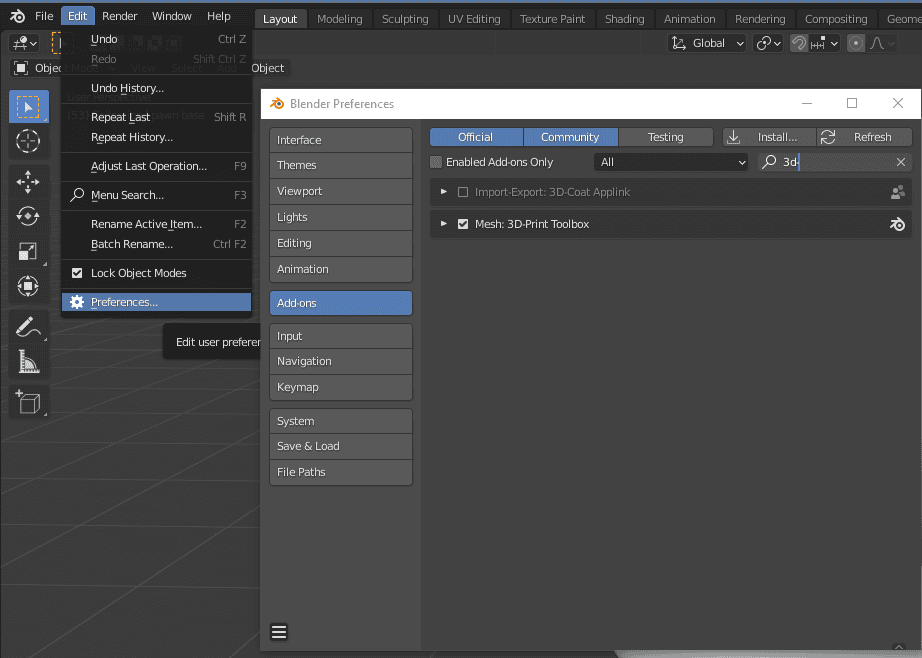
To then access this add-on, you need to open a side panel in the viewport and find it there.
Using the add-on we can check if the mesh is ready for exporting, see what problems it has, and even can help you to fix these problems. In the end, you can use the add-on to export the object too.
Fixing Mesh for 3D Printing
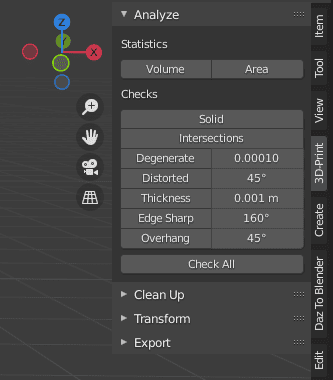
Before 3D printing, we need to make sure that the mesh is ready and will be printed without problems. This is where the 3D-Print tool comes to help us. It can automatically try to find any problems with the mesh that we have, just click on the Check All and it will tell you:
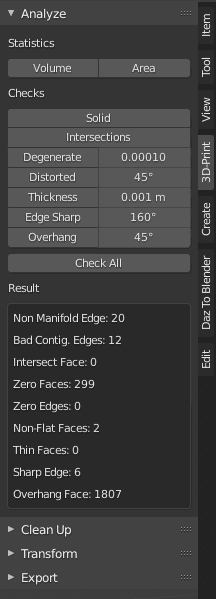
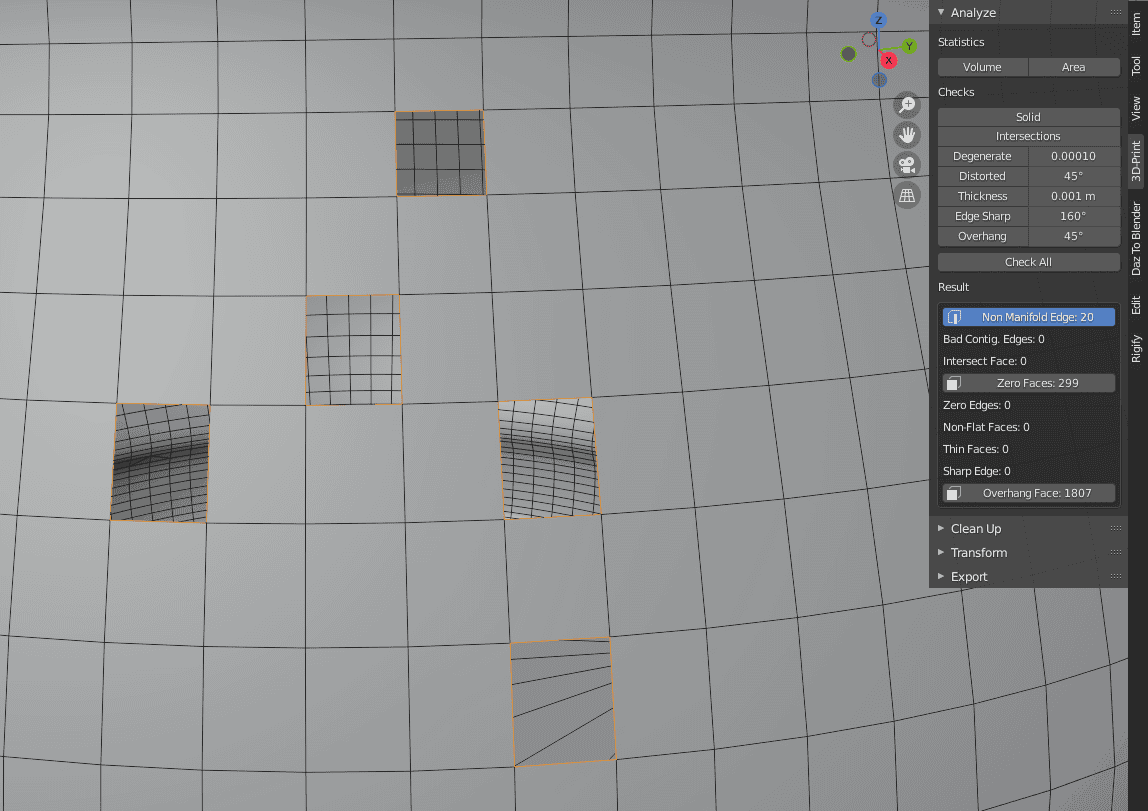
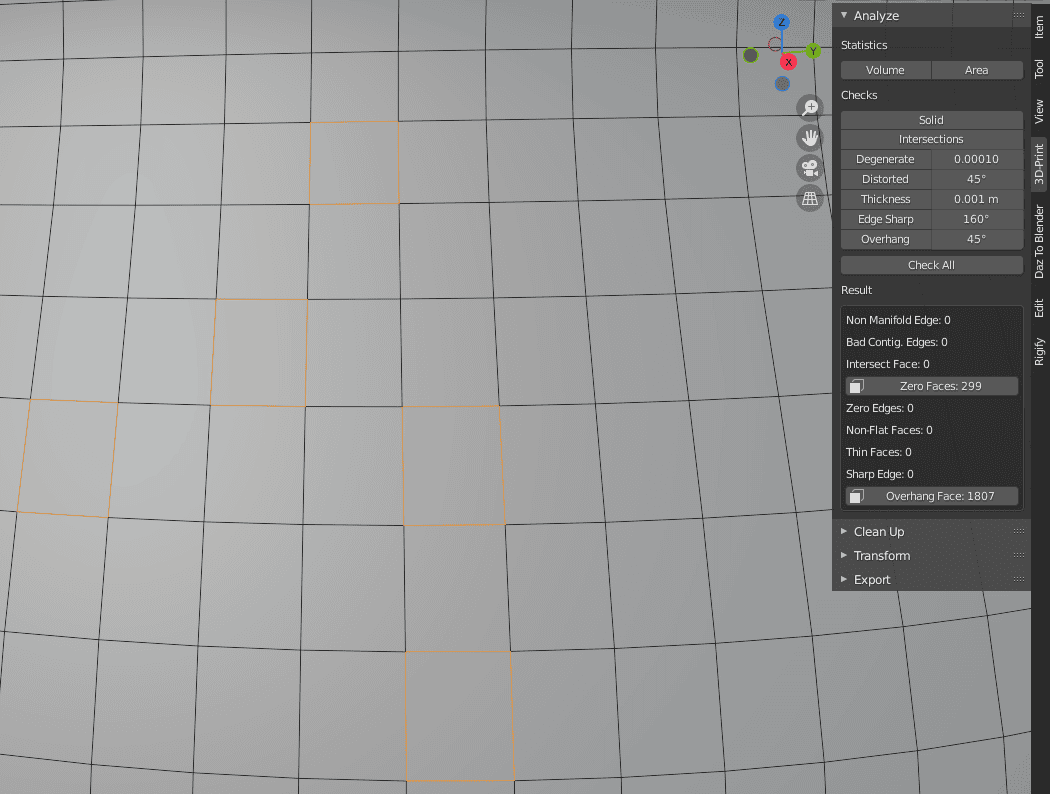
In the Result we see that mesh has some problems, so let’s see them and try to fix them. By the way, in the Edit mode, these results are selectable. After clicking on them – it will even automatically select the faulty faces/edges/vertices.
As you can see, Non-Manifold edges are edges that are not connected into faces and thus they make “holes” in the mesh. All I need to do here to fix them is to Fill these edges.
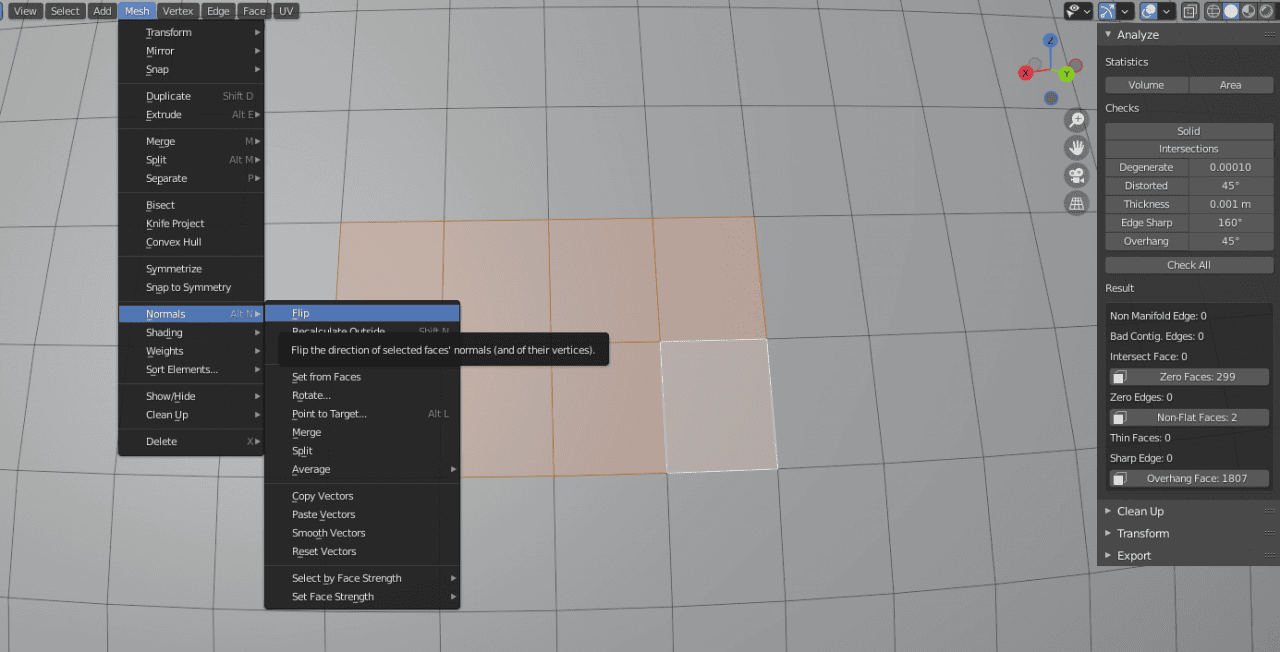
Next is the Bad Contiguous Edges problem. It happens when there is a problem with Normals orientation. So if your normals are not how they are supposed to be – you will see this error.
It also can be a very noticeable problem even without the add-on. Here is how it can look:
This is a very easily fixed problem. You can select the whole object and go to the Mesh > Normals > Recalculate Inside. This will recalculate everything and is supposed to fix the problem.
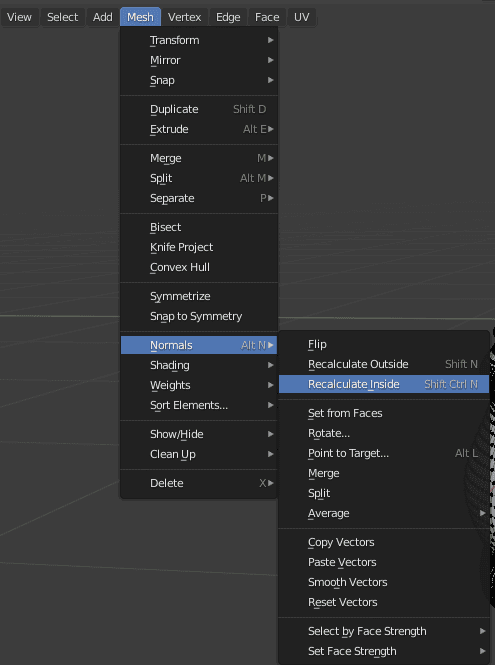
Or you can do this manually, by selecting the problematic faces and selecting the Flip option in the same Normals settings. This will flip normals only for selected faces.
Next, we have Intersect Face. It is when you have overlapping geometry – it is the problem that I explained and fixed at the beginning of the tutorial. So remember to use the Union Boolean instead of joining objects and that is it.
After that are Zero Faces and Zero Edges. They are faces and edges that can be considered “too small”. As I said, there is no need for high-poly models, because it would not print all these polygons anyway.
So these two results say to us that there are these kinds of small faces. They are not the problem and it will print normally even with them, but it can be a good idea to look at them closer.

So add-on tells me that these faces are problematic. So maybe I would want to Decimate it again to fix this problem. But it is important to understand that this is a suggestion, not a requirement. You can leave it as is and it should be fine.
Though I listened to this advice from the add-on and decimated a bit more. Now I have no zero edges or faces.
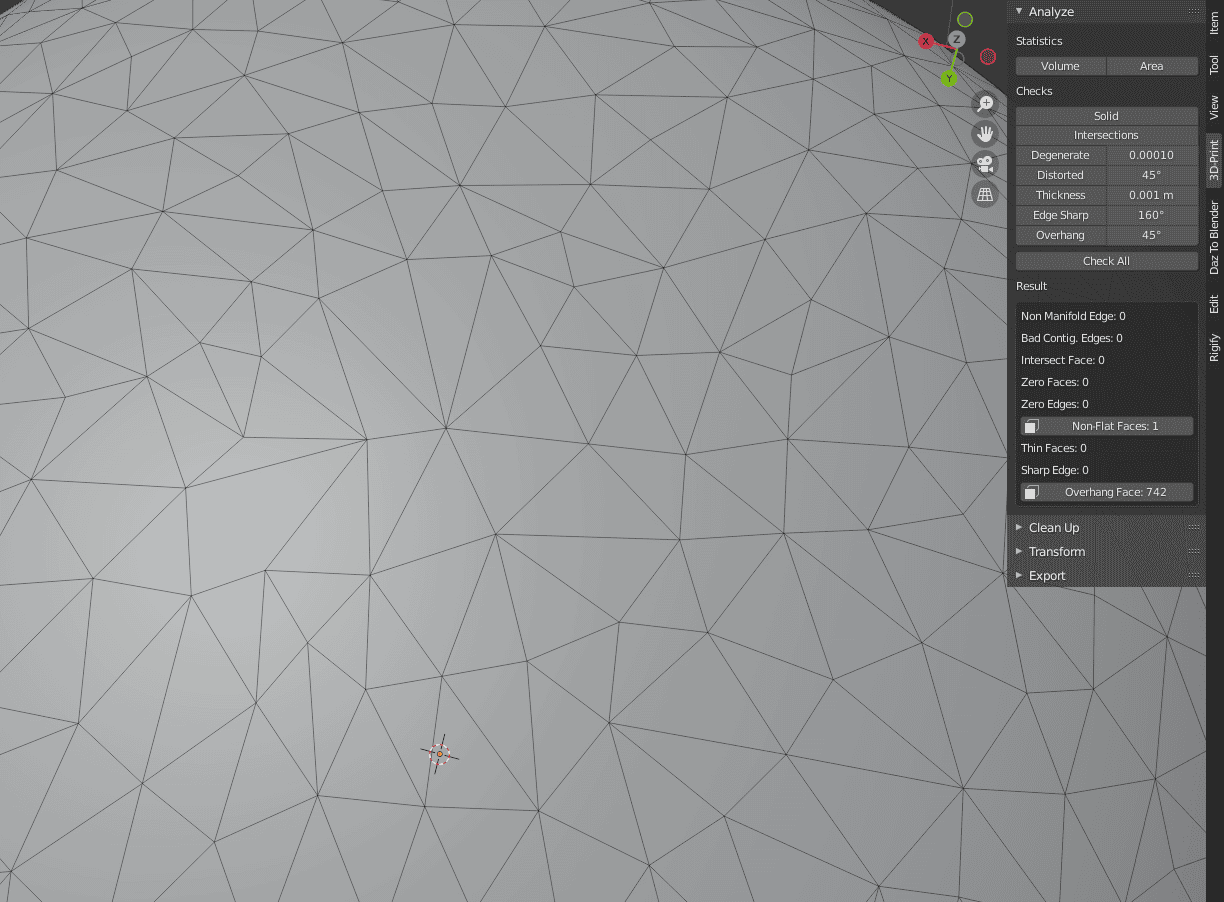
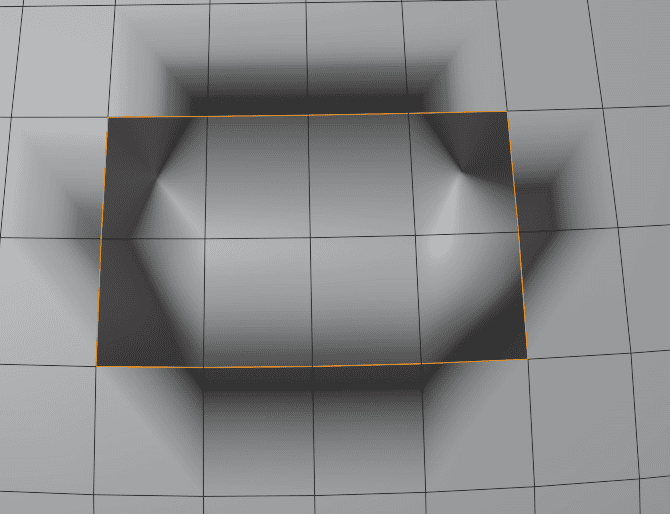
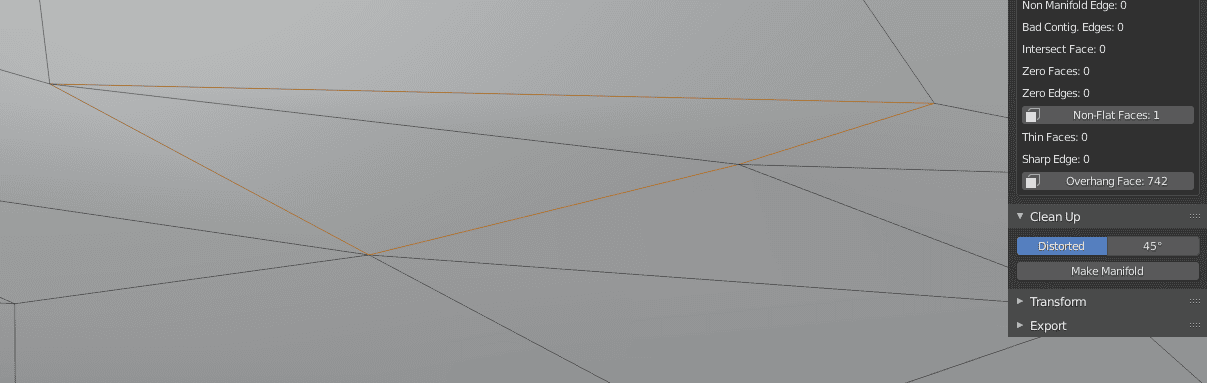
We still have a Non-flat Face. As it comes from the name, it is a face that is not flat, which should not be possible in real life. Thus, a problem.

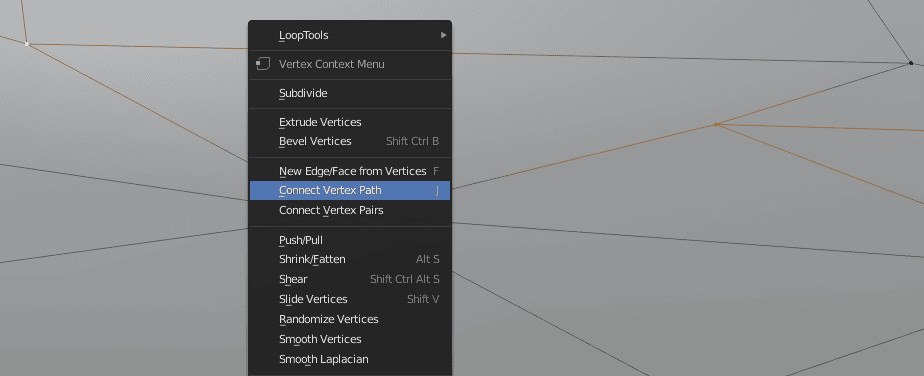
Here is this face. It may be hard to see on a screenshot, but it is not flat. Some vertices are further than others, which creates a bend, which should not be possible. You can fix this by manually moving vertices around or by turning this n-gon into two triangles by adding an edge.
This can be done either manually by selecting vertex and connecting them with the Blender tools.
Or this also can be done by selecting this face and using the add-on’s Clean-up section to do the same thing I just did, but automatically.
Thin Faces and Sharp Edge should be pretty self-explanatory. The first one is when you have a thin face without any support. This means that this part of the object can’t exist in the real world.
And the Sharp Edge is when there are edges that create a too sharp shape. Most likely, it could not be printed like this, so you need to either manually fix it or add a bit of detail, like subdivision, to this place.
Lastly, we have Overhang Faces. These are faces that are hanging above the ground at the angle of 45° or higher.
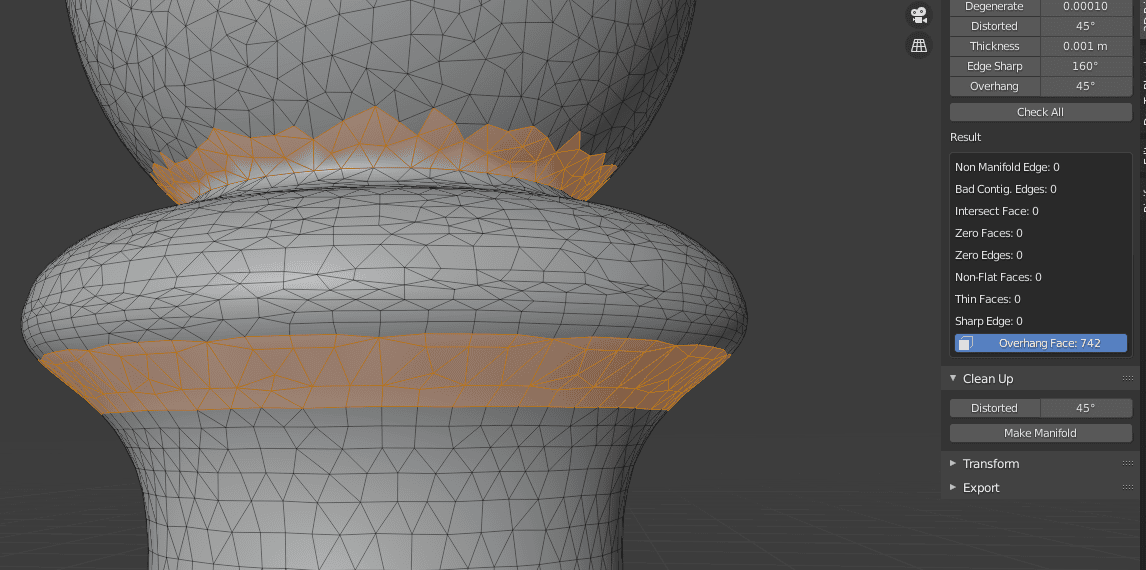
Parts of the object like this will probably fall, when being printed. This is just how gravity works. But worry not, because it is not a big problem. All you need to do is to add supports. Doing this manually in Blender would be difficult and I don’t recommend anyone doing it. But there is plenty of third-party software, where you can import this object later and add supports much easier. Probably even with a single press of a button. For example, the FreeCad, which is, well, free.
We are done with Analyzing an object, but it is not yet ready to be printed. One more thing you need to do is scale it, so it will fit your 3D printer device. And again, the 3D-Print add-on helps us with this, as it has a Transform section.
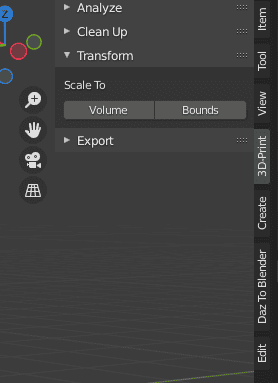
Here you can scale the selected objects in Volume and in Bounds. So, for example, I know that my printer can print objects only up to 0.5 meters in length. Using Bounds transform, I can set this value and it will automatically change the object, so it would fit.
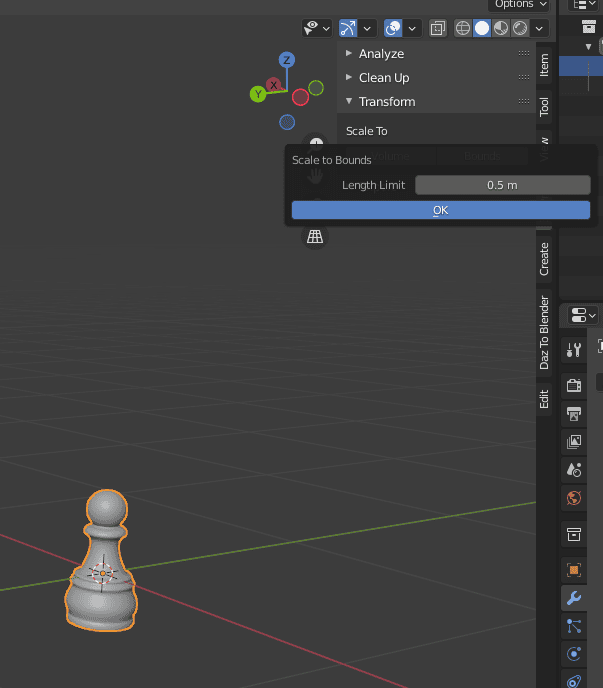
After this, it would be a good idea to again analyze the object with the add-on to make sure that everything scaled fine. Though there may be a lot of new Zero faces, but don’t worry as I previously said – it is not a requirement to fix them. Just because you made an object much smaller, it now considers a lower value as the threshold for the Zero Face.
Daz3D Figures That You Can Print
In addition to Blender articles, we also make ones about Daz Studio – another free 3D Design software. One of the big things about Daz3D company is the very diverse marketplace that they have. There you can find a lot of interesting figures that you may want to 3D print. And as Daz Studio is free and there is a Daz to Blender Bridge free add-on – it is possible to do this easily.
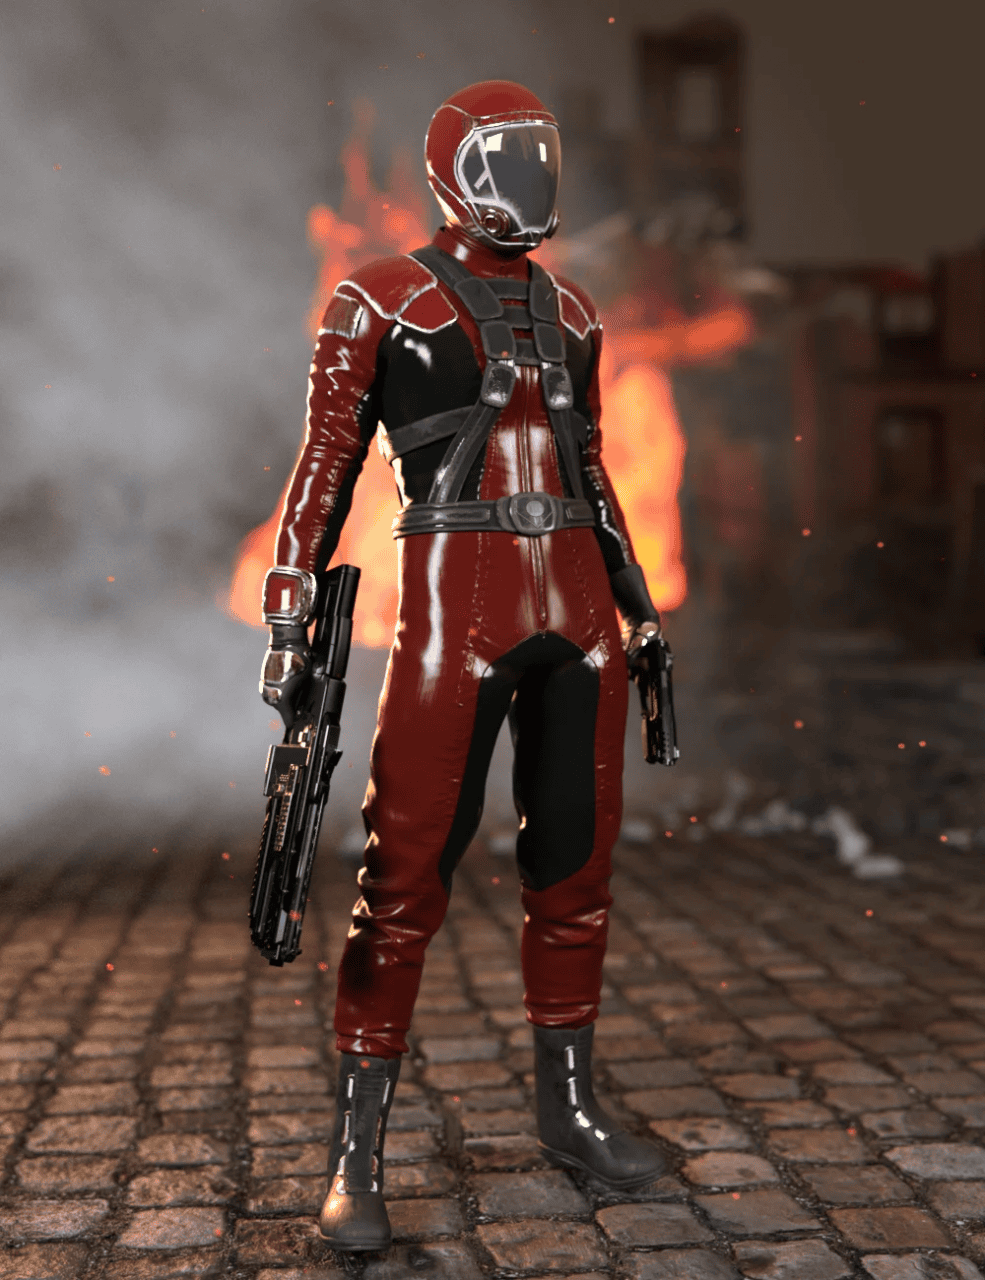
For example, you can get a Sci-Fi Gravity Suit Outfit for Genesis 8 and 8.1 Males by Yura. It can be applied to a figure that is built-in in the program. So, in the end, you can have a very nice sci-fi figurine.
Source Sci-Fi Gravity Suit Outfit for Genesis 8 and 8.1 Males by Yura
Or you can just get a model of a lion – Felidae by AM – Lion. It is a very nice and detailed model of a realistic lion.

Source Felidae by AM – Lion
Also there you can find bundles like Monsters and Wheels Bundle
Monsters and Wheels Bundle by Daz Originals. By getting this one product, you will receive a lot of different stuff, such as characters, monsters, poses, outfits, and vehicles. All of which can be printed and used as awesome figures.

Source Wheels Bundle
Monsters and Wheels Bundle by Daz Originals
Conclusion – Blender 3D Printing
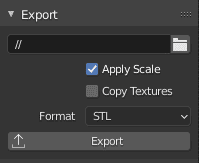
After everything is done and the add-on does not see any major problems in your object – you can export it using regular Blender exporting or the add-on tool. Then it is a matter of adding supports and printing an object.